PHOTO GALLERY
SOUTHEY
The photos on this page are from the Victor J. Southey slides housed in Coll-202 at Archives & Special Collections, MUN Library. They were donated to the Archives in 1993 by his daughter, Carol Pushie, who had previously loaned them to the Bell Island Murals Committee to help them create some of the scenes for the giant murals painted on Bell Island buildings between 1992 and 1995. It is not known if Mr. Southey was the photographer. Tom Careless, who was Assistant to him during his term as manager at Wabana, took many beautiful slides of Bell Island during the same period. Several of the Careless photographs are very similar to some in this collection, so it is possible that these slides were also taken by him. (See the "Careless" photographs in the drop-down menu under "Photo Gallery.") Following is a brief biography of Victor J. Southey covering his time on Bell Island. A fuller bio can be found on the People page of this website. There are a total of 87 slides in the collection (92 originally, but 5 were missing at the time they were donated to the MUN Library). There were no dates attached to the slides, however, photo #20 shows the gymnasium extension on the Boys' Club in the left center; that extension was completed in November 1956. Photo #19 shows the original St. Augustine's School still standing at the intersection of Grammer and 4th Streets. The school burnt to the ground on December 10, 1963, so the photos were taken between 1957 and 1963. If they were all taken the same year, it was very likely 1963 as photo #6 is of the Vocational Trades School, which opened in 1963. The number attached to each photo is the number written on the original slide.
|
Victor John Southey (1909-1971): Mining Engineer, Manager. In June, 1956, he was appointed General Superintendent of Dominion Wabana Ore Limited. A year later, he was appointed Works Manager, a position he held until 1963. After Hawker Siddeley Canada, the final owners of the Wabana Mines, declared they were closing the operation, Southey was among DOSCO officials who attended meetings with Premier Smallwood and the Government of Newfoundland in hopes of persuading them to take over the running of the mines, but their efforts failed. He authored a paper entitled "History and Problems of the Wabana Submarine Iron Mines" that was published in the Canadian Institute of Mining and Metallurgical Bulletin in 1969. The paper gives a good overview of the history of the mines, outlining the changes in the operation over the years and the problems with the ore that eventually led to the closure of the mines. You can find the article in the drop-down menu under "Publications" in the menu above.
Source: Submarine Miner, V.4, No.7, July 1957, p. 2. |

|
Index
I have posted the slides here in the order in which they were numbered by Bill Pushie, Victor Southey's son-in-law, who organized and prepared them for donation to the Archives and Special Collections at MUN Library. Following is my subject index to the slides:
Air Strip: #70
Anchorage: #78, #90
Army Cadets: #8
Back of Bell Island: #42-44, #46, #80
The Bank of Nova Scotia: #22
The Beach: #1, #2, #23, #60, #64, #66, #67
Belt Conveyor: #58
Bennett Street: #8, #13, #19, #22
Bridal Avenue Area: #11, #53
Butler's Marsh: #70
Company houses: #4, #5, #11, #18, #19, #21, #36, #52, #53, #70-74, #78
Court House: #22
Davidson Avenue: #15, #72-74
Dominion East Track: #27, #65
Dominion Pier Area: #10, #23, #27, #40, #48, #51, #57, #65, #81
Dominion Range: #4, #18, #19
Dominion West Track: #26, #27
East End: #3, #19, #20, #23, #66, #67
Ferry: #60, #61, #63, #64
44/40: #68, #74
The Front: #10, #15, #23, #26, #27, #33, #40, #48, #50, #53, #57, #65, #66, #81
Government Building: #22
Grammer Street: #4
The Green: #16-18, #38, #52, #68
Lance Cove Road: #26
Light House Area: #67
Long Harry: #67
Magazine (Dynamite): #45
Main Office (DOSCO): #22
Main Street: #66
No. 2 Road: #17,
No. 3 Bridge: #73, #74
No. 3 Mine Area: #18, #19, #34, #36, #38, #39, #47, #52, #68, #72-74
No. 4 Mine Area: #31, #32, #70, #71.
No. 5 Surface Mine: #28, #43-46, #70
No. 6 Mine Area: #17, #18, #29, #37, #38, #68, #69, #74
Ore Ships: #26, #78, #81-84, #86-89
Outcrop: #70, #74
Portugal Cove: #14, #24, #25, #41, #61-63
Power Plant: #51, #65, #81
Scotia No. 1 Surface Mine area: #75
Scotia Ore Road: #9, #26, #27, #58, #68, #72-74, #81
Scotia Pier Area: #12, #23, #26, #30, #33, #35, #40, #49, #50, #53-58, #78, #81-84, #86-92
Scotia Ridge Area: #18, #19, #72-74
Snob Hill (now DOSCO Hill): #5
Staff House (DOSCO): #22
Stewart's Bridge: #26, #27, #49
Surgery (DOSCO): #21;
Ten Commandments Range: #36, #72, #74
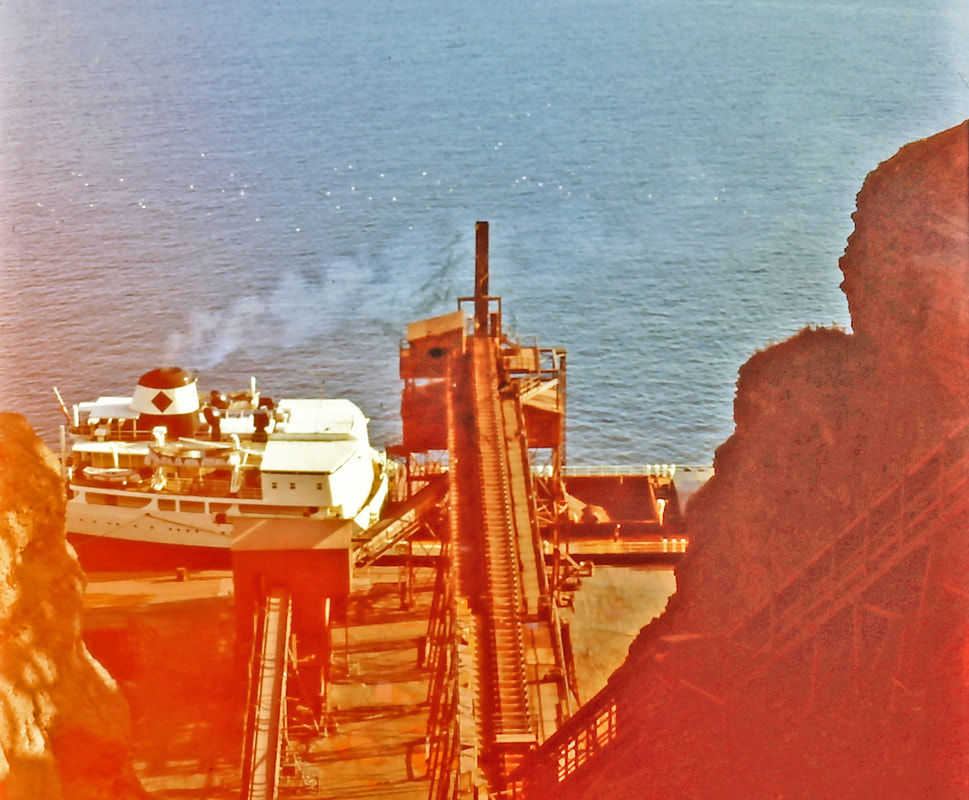
Town Square Area: #7, #20, #21
West Dam: #26
West Mines Area: #6, #28, #43-47, #68, #70, #74, #75
West Mines Road: #72-74
Air Strip: #70
Anchorage: #78, #90
Army Cadets: #8
Back of Bell Island: #42-44, #46, #80
The Bank of Nova Scotia: #22
The Beach: #1, #2, #23, #60, #64, #66, #67
Belt Conveyor: #58
Bennett Street: #8, #13, #19, #22
Bridal Avenue Area: #11, #53
Butler's Marsh: #70
Company houses: #4, #5, #11, #18, #19, #21, #36, #52, #53, #70-74, #78
Court House: #22
Davidson Avenue: #15, #72-74
Dominion East Track: #27, #65
Dominion Pier Area: #10, #23, #27, #40, #48, #51, #57, #65, #81
Dominion Range: #4, #18, #19
Dominion West Track: #26, #27
East End: #3, #19, #20, #23, #66, #67
Ferry: #60, #61, #63, #64
44/40: #68, #74
The Front: #10, #15, #23, #26, #27, #33, #40, #48, #50, #53, #57, #65, #66, #81
Government Building: #22
Grammer Street: #4
The Green: #16-18, #38, #52, #68
Lance Cove Road: #26
Light House Area: #67
Long Harry: #67
Magazine (Dynamite): #45
Main Office (DOSCO): #22
Main Street: #66
No. 2 Road: #17,
No. 3 Bridge: #73, #74
No. 3 Mine Area: #18, #19, #34, #36, #38, #39, #47, #52, #68, #72-74
No. 4 Mine Area: #31, #32, #70, #71.
No. 5 Surface Mine: #28, #43-46, #70
No. 6 Mine Area: #17, #18, #29, #37, #38, #68, #69, #74
Ore Ships: #26, #78, #81-84, #86-89
Outcrop: #70, #74
Portugal Cove: #14, #24, #25, #41, #61-63
Power Plant: #51, #65, #81
Scotia No. 1 Surface Mine area: #75
Scotia Ore Road: #9, #26, #27, #58, #68, #72-74, #81
Scotia Pier Area: #12, #23, #26, #30, #33, #35, #40, #49, #50, #53-58, #78, #81-84, #86-92
Scotia Ridge Area: #18, #19, #72-74
Snob Hill (now DOSCO Hill): #5
Staff House (DOSCO): #22
Stewart's Bridge: #26, #27, #49
Surgery (DOSCO): #21;
Ten Commandments Range: #36, #72, #74
Town Square Area: #7, #20, #21
West Dam: #26
West Mines Area: #6, #28, #43-47, #68, #70, #74, #75
West Mines Road: #72-74
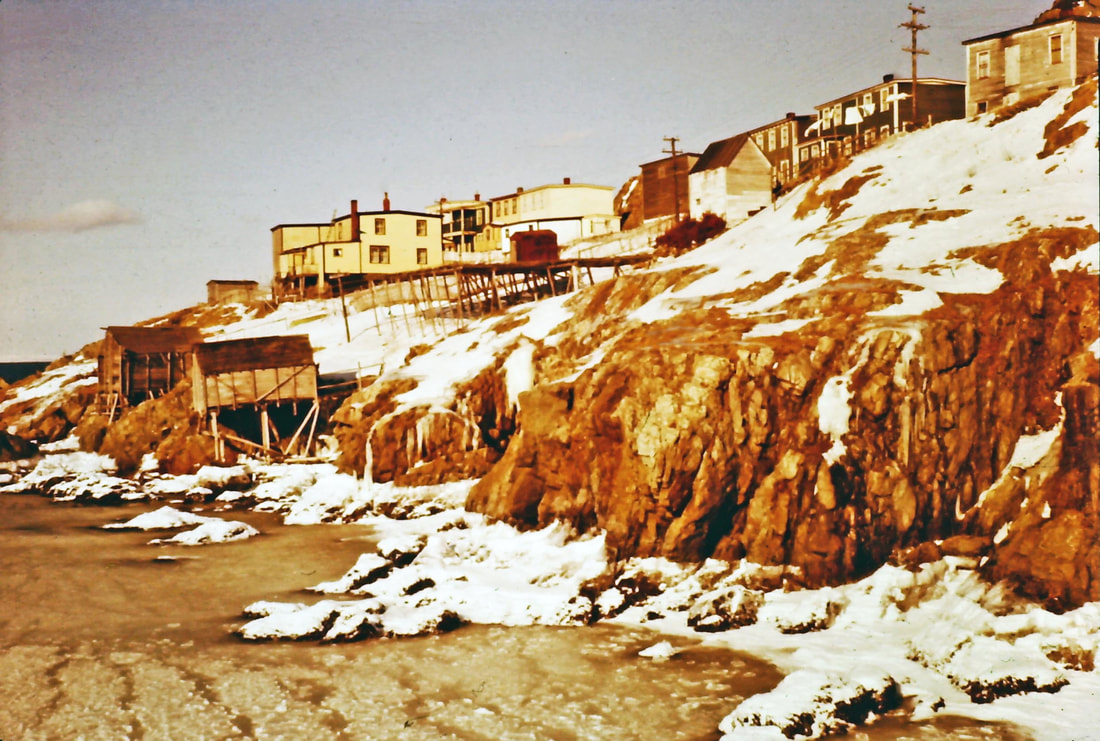
#1 The Beach Hill.
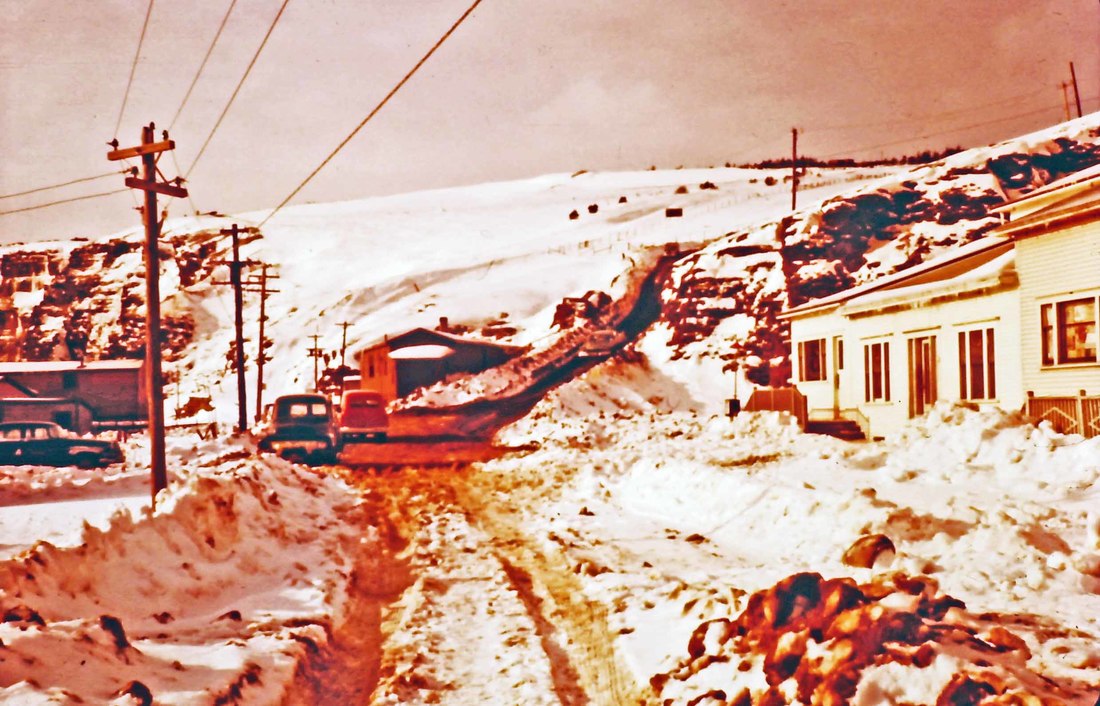
#2 The Beach Hill in winter. Dicks' Tavern on the right.
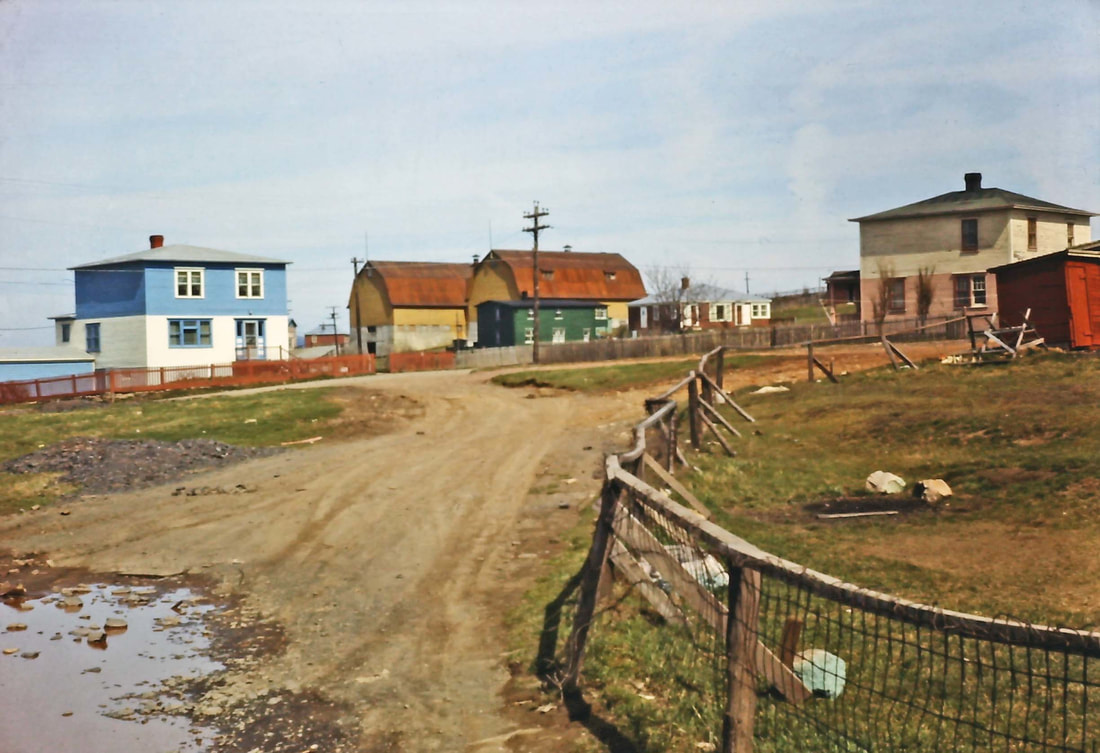
#3 The north end of Armoury Road where it meets Quigley's Line (to the left out of scene). John Nolan's blue & white house on the left; Tom Neary's dairy barn in background; Sarah Neary's green house (widow of Tom); Reid Proudfoot's brown bungalow; Fred Lodge's 2-storey house on right.
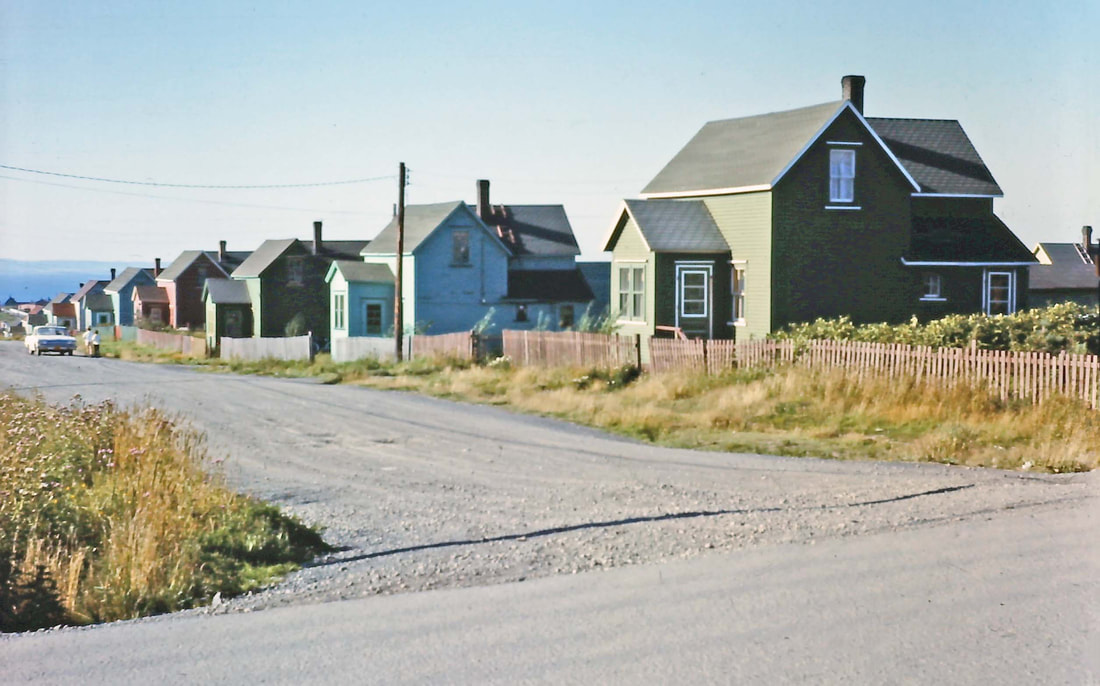
#4 Grammer Street (north of Bennett Street) Dominion Company houses built c.1907 and named in honour of Dominion Company's first manager on Bell Island, William S. Grammer.

#5 Snob Hill, now called DOSCO Hill, the last houses built by the Company c.1959.
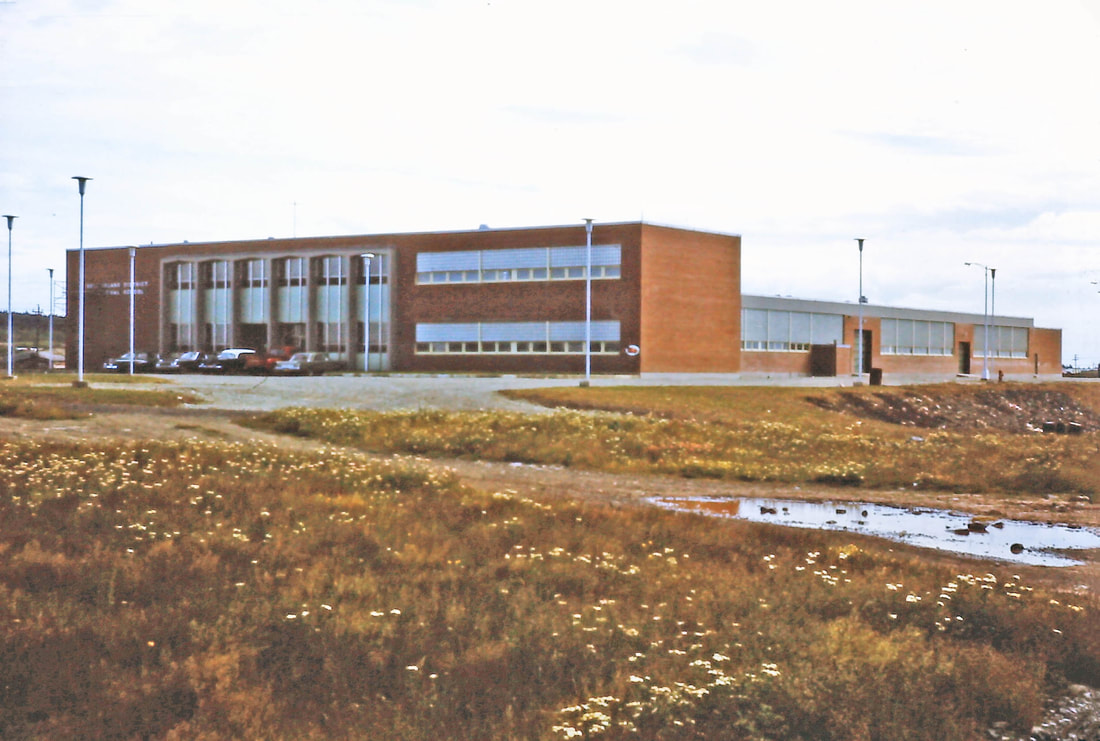
#6. Vocational Trades School, West Mines Road.
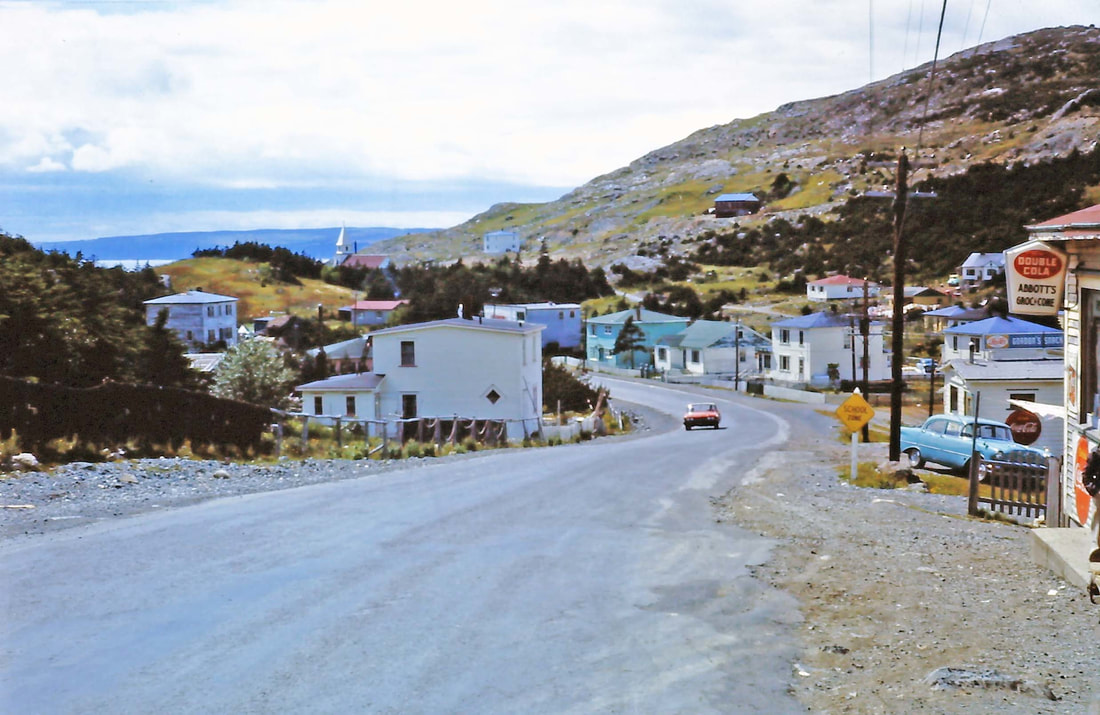
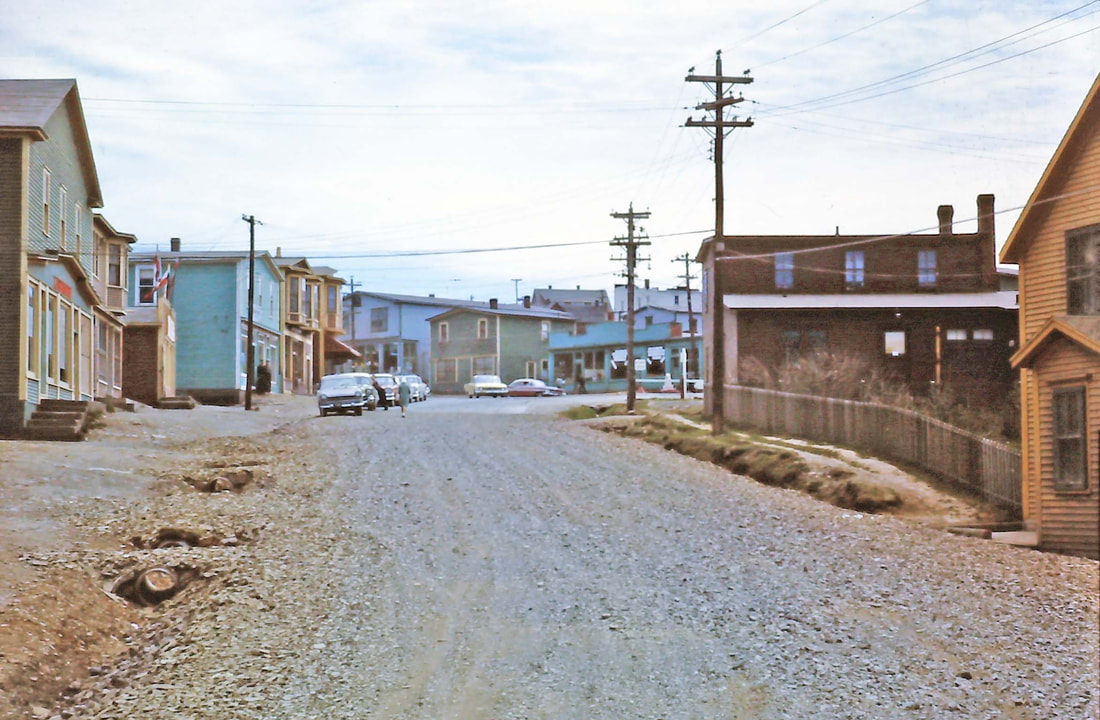
#7 Town Square, northwest side where it meets No. 2 Road (to the right, out of the scene).
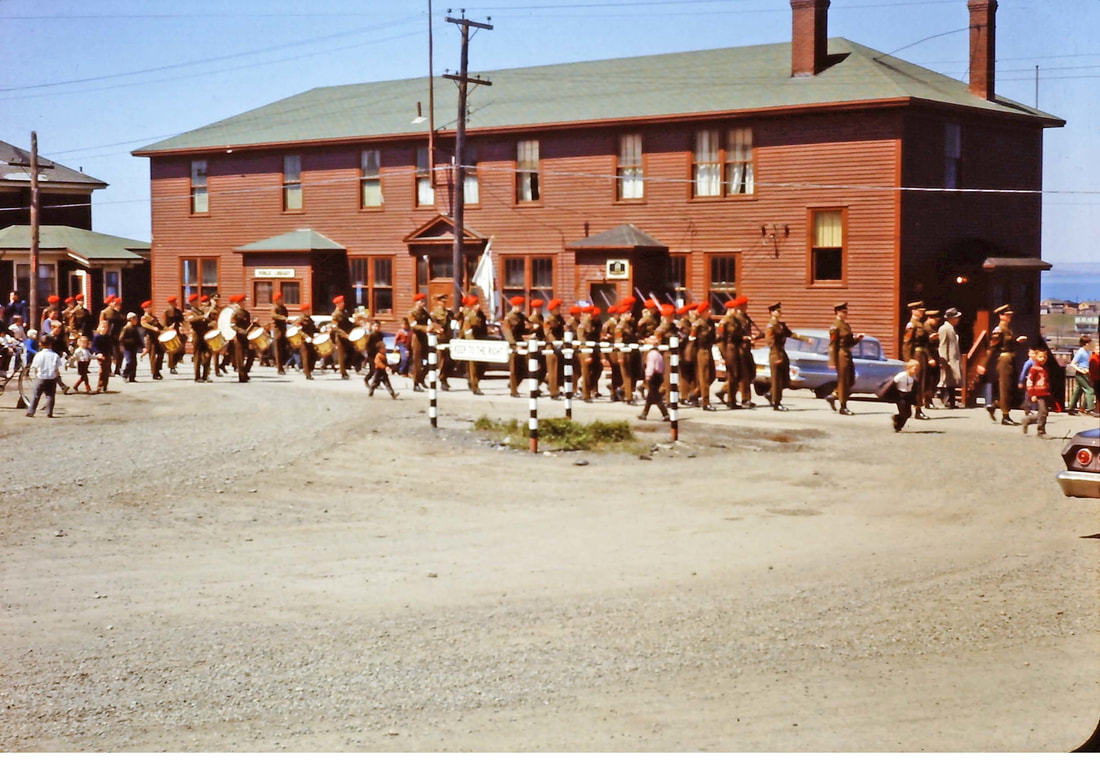
#8 St. Kevin's Army Cadets marching past the Bank of Nova Scotia and the Public Building on Bennett Street.
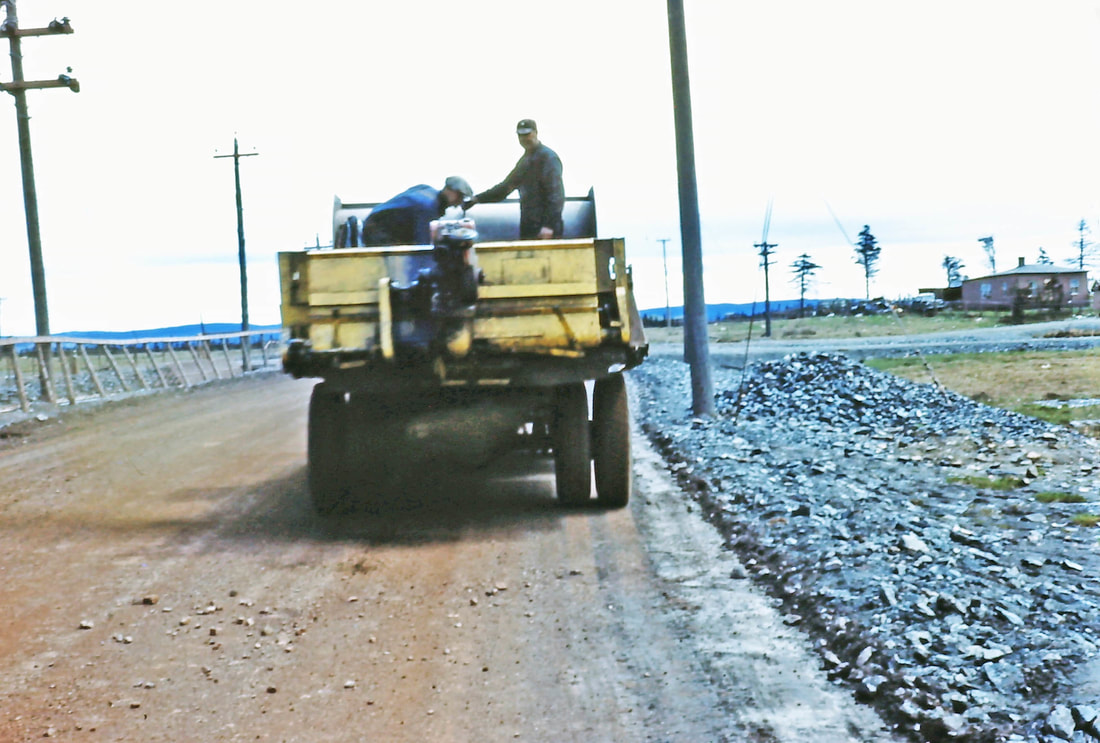
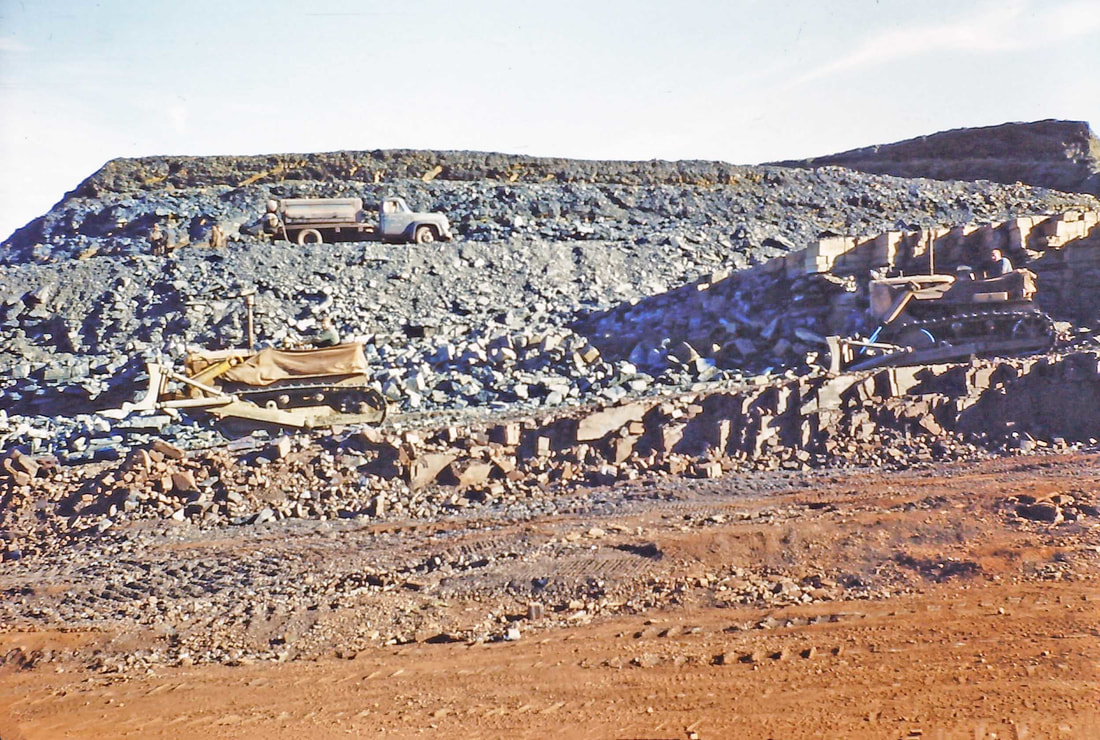
#9. Chlorine Spreader on Scotia Ore Road. Calcium chloride was used to control dust on dirt roads.
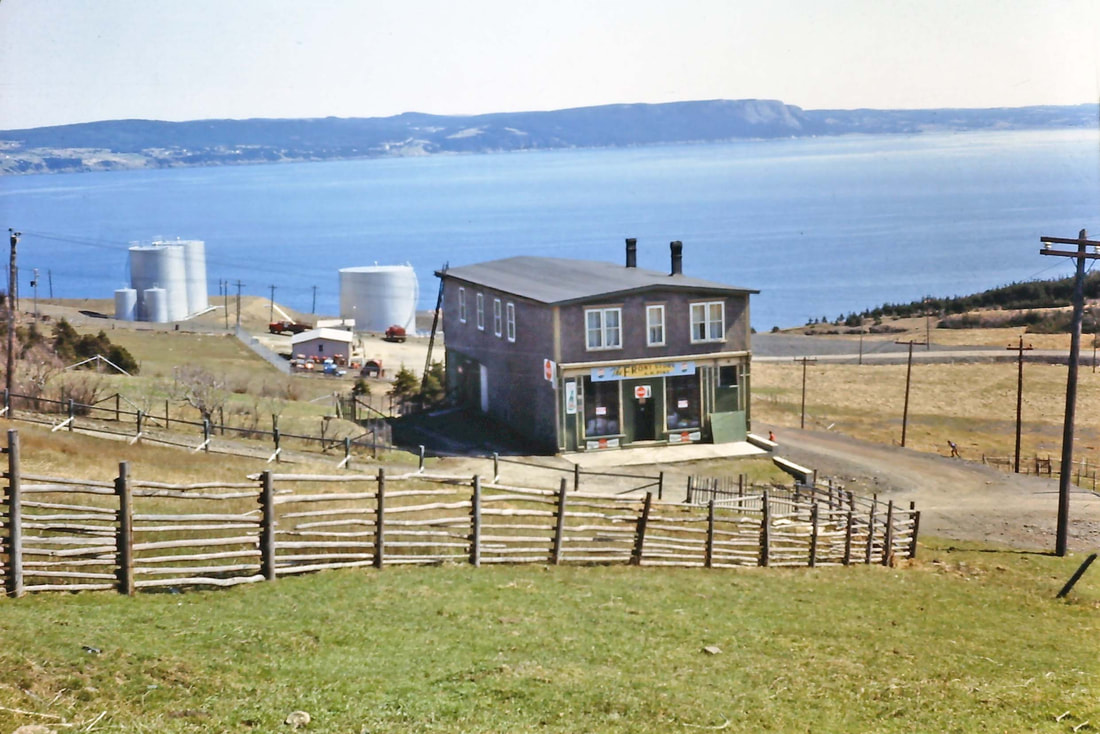
#10 J.B. Martin's Store, Old Front Road, just uphill from Dominion Pier. This may have been the first shop on Bell Island. The road to the west of it was called Martin's Hill and it was originally the Dominion East Tramway. By the time this photo was taken, Dominion Pier was no longer being used for shipping ore and the shop was called "The Front Store," owned by Herbert Pike.
#11 Parking area off Lance Cove Road for Scotia Pier (to the right, out of the scene). The five one and one-half-storey houses in the upper left are Scotia Company houses built in 1911 on Bridal Avenue, so named because the original occupants were all newly-wedded couples from Nova Scotia. The white United Church manse is seen on the horizon just above the first Bridal Avenue house.
#12 The Old Front Road runs through the middle of this photo (just west of photo #10 above). The Scotia Pier stockpiling area is seen along the upper left of photo, with Little Bell Island and Kelly's Island in the distance.
#13 Bennett Street east at the point where it meets the former Dominion East Tramway, now called Steve Neary Boulevard. Some buildings, left to right: Wes Farrar's house, Sapp's Store, Bowring's Store (white), Immaculate Conception RC Church on Town Square, Leonard's Store (brown & white), and Bennett's house (green). The DOSCO Main Office was behind and to the right of the photographer.
#14 Portugal Cove on the way to the Bell Island ferry terminal. Abbott's Groc. & Conf. on the right.
#15 Connor's Hill (previously called Steele's Hill), part of Davidson Avenue. The War Memorial is behind the photographer. Jackson United Church is on the left horizon.
#16 The Green, looking to the north.
#17 The Green as seen from Bennett Street where it meets the former Dominion East Tramway (now Steve Neary Boulevard). No. 6 Deck Head is on the left horizon. The one and one-half storey houses in the foreground are Dominion Company houses with No. 2 Road between them and The Green. The Post Office is the low building in the middle of the photo. On the right is the original fire hall.
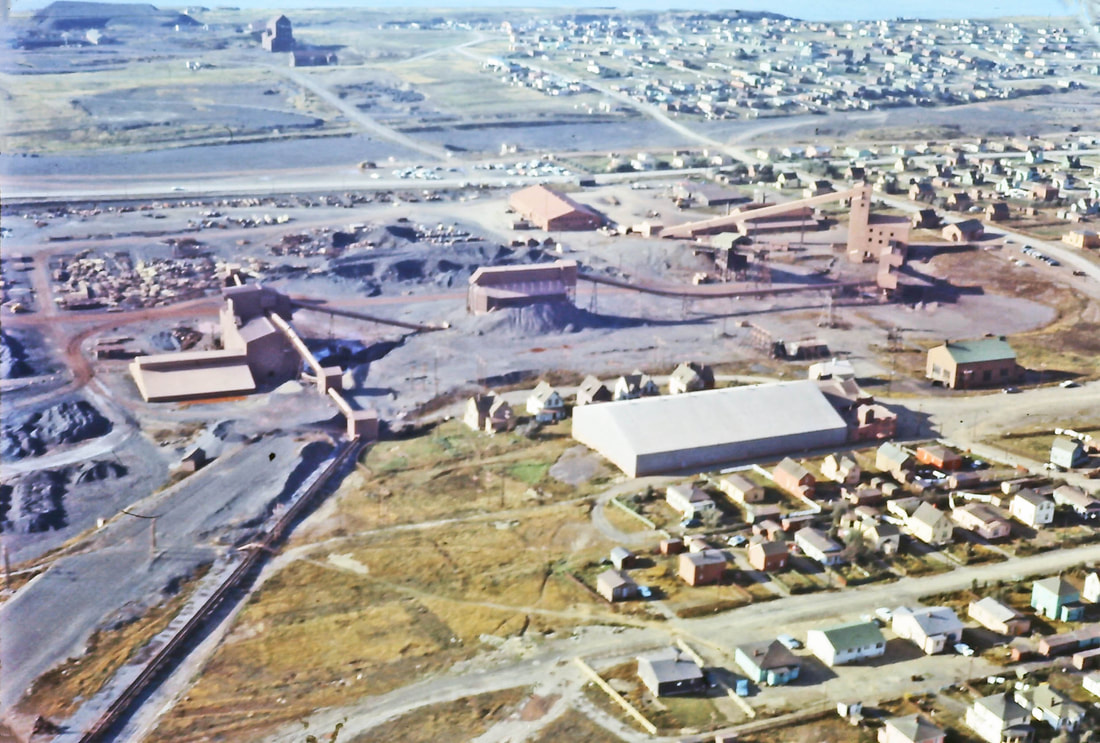
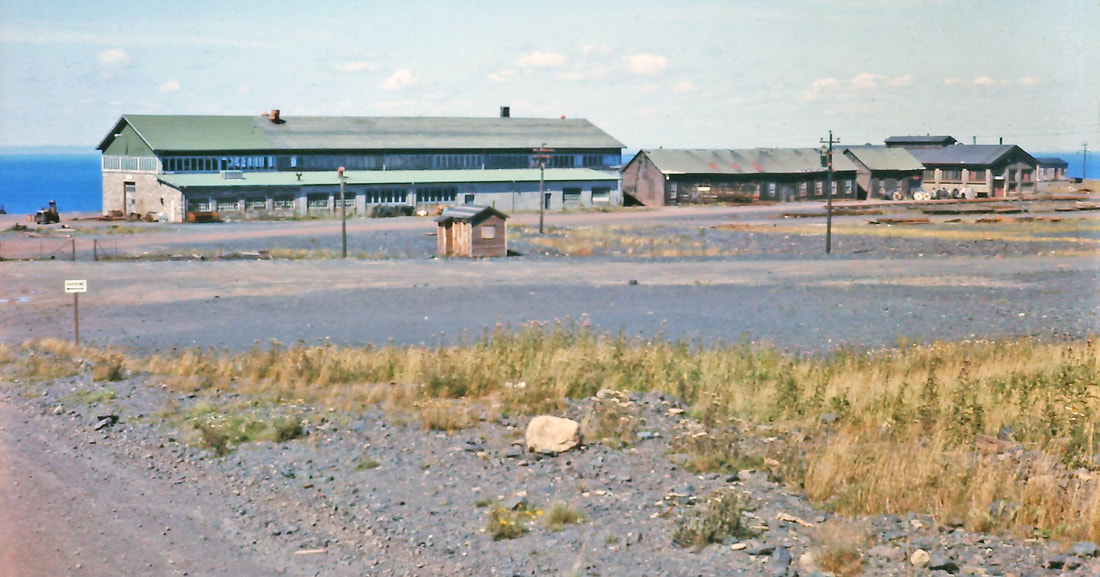
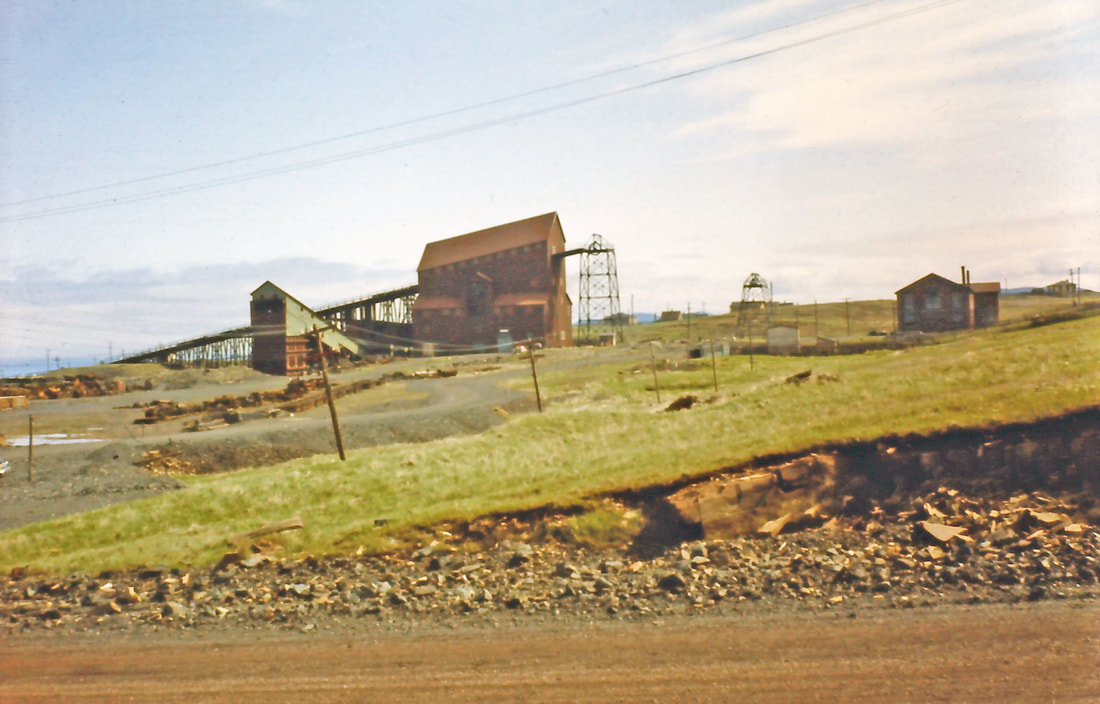
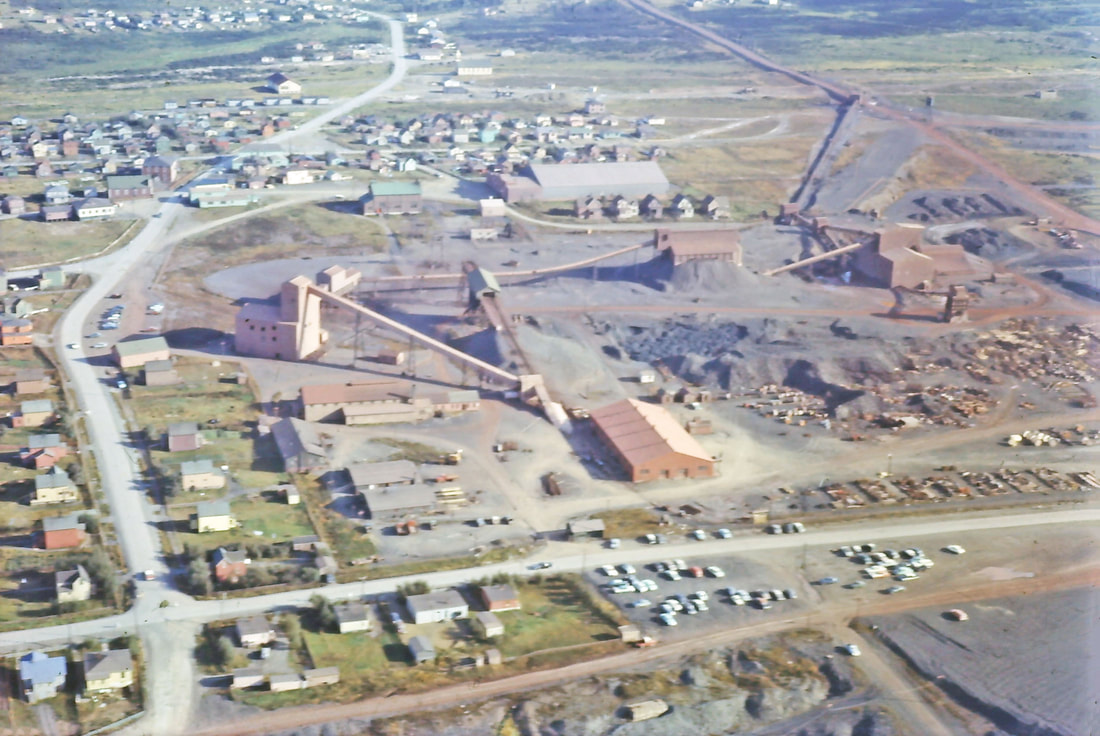
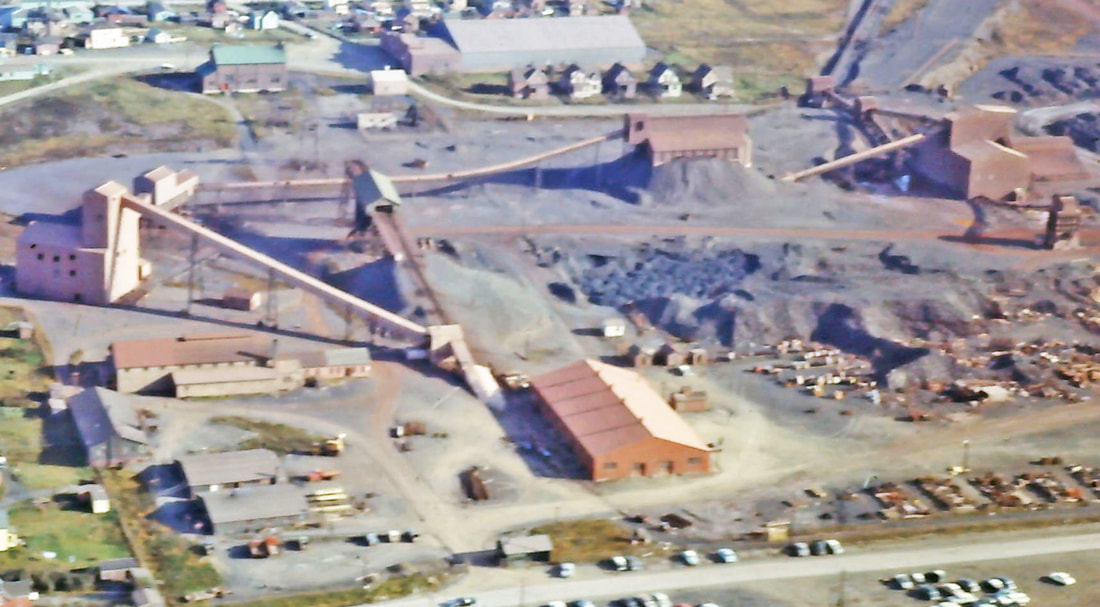
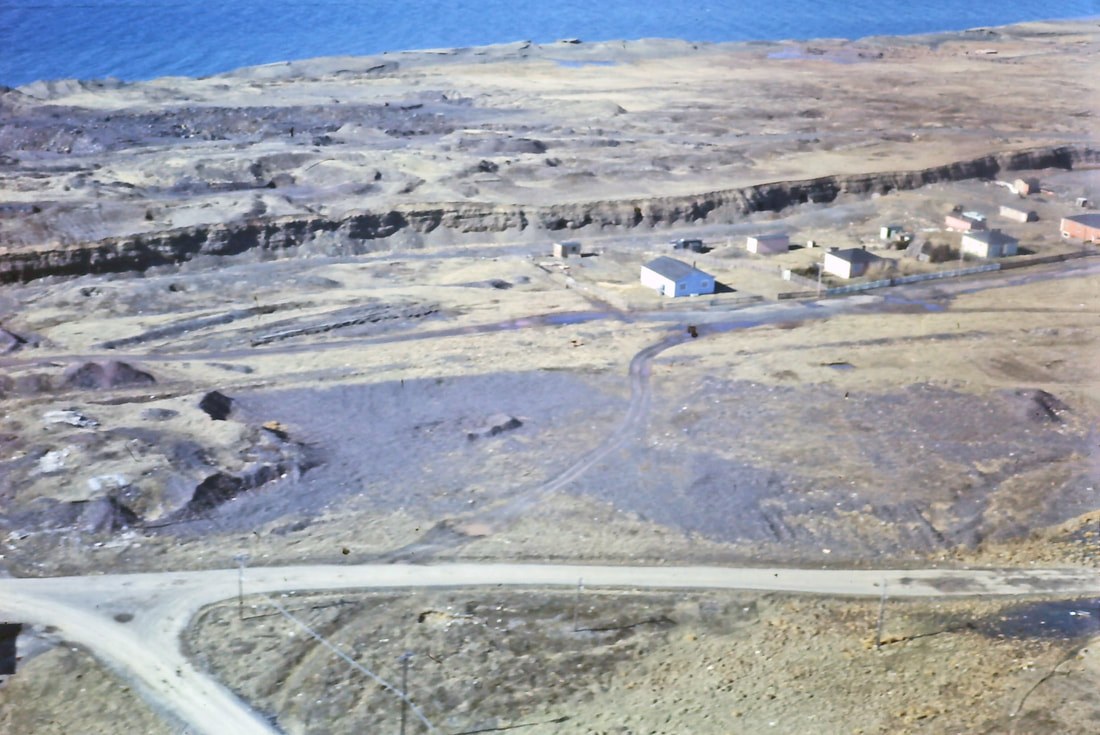
#18. Aerial view of No. 3 Mine Yard with No. 6 Mine Yard in the distance. Houses in the foreground are Scotia Company miners' houses on Scotia Ridge. On the north side of the Arena are 5 Scotia Company staff family houses on what was known as Wall Street (no longer there). The houses to the east of No. 3 Yard are Dominion Company miners' houses on Ten Commandments Range and Dominion Range. The road going left to right just north of No. 3 Yard is West Mines Road, which becomes No. 2 Road after the intersection with Davidson Avenue at the NE corner of No. 3 Yard. The houses in the distance to the northeast are on The Green. In the early days of mining, Scotia Company built shacks for commuting miners there as well as miners' and staff family houses. Below is a cropped version of this photo, enhanced to show more detail of the structures in No. 3 Yard.
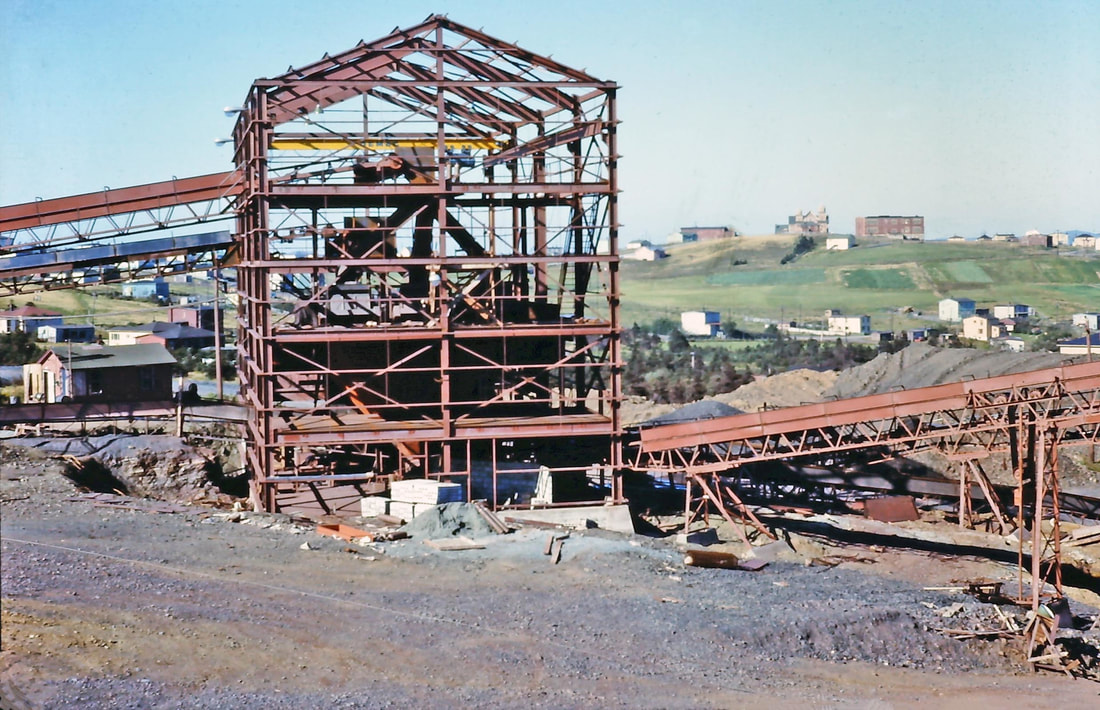
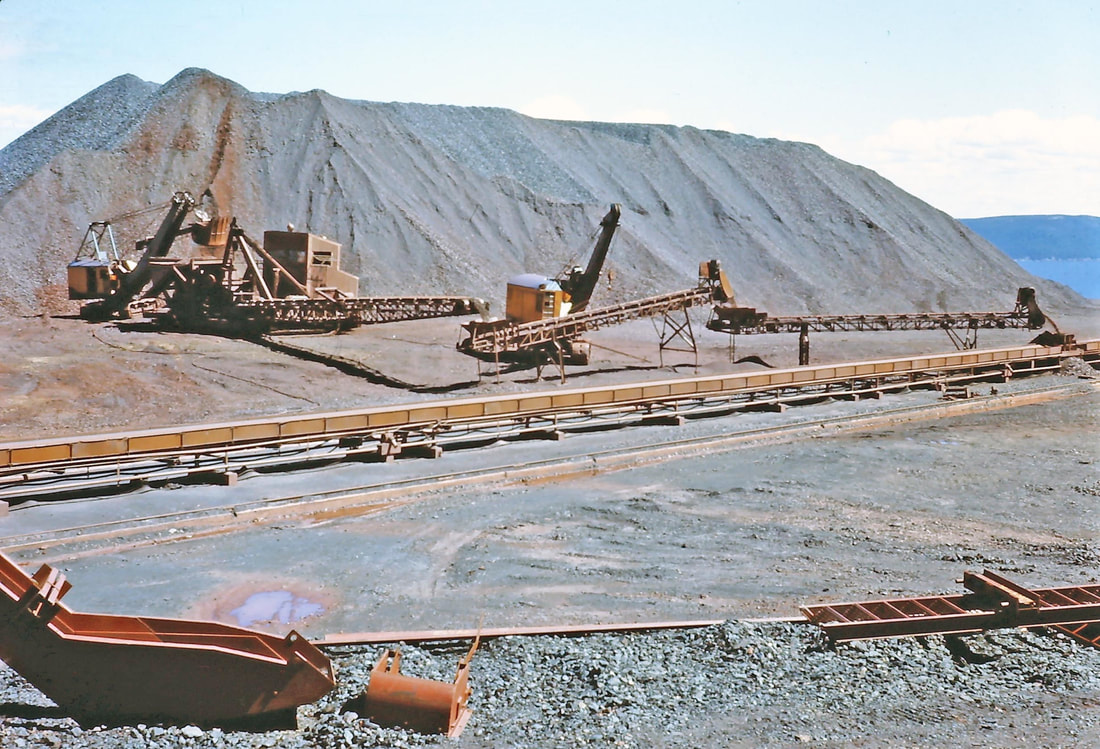
#18-cropped version: No. 3 Mine Yard c.1959: This is a cropped version of the Southey aerial photo (#18) of No. 3 Mine Yard. I have also enhanced it to make the structures stand out as much as possible; not easy as they are almost the same colour as the iron ore covering No. 3 Yard. Here is a description of the structures using information that was given in the Submarine Miner January 1958, p. 7 and March 1959, p. 7: In the top right (the east side of the yard) you see the new Ore Conveyor System (long slanted structure) leaving No. 3 Slope Collar and entering the new No. 3 Deckhead Building. (Dwarfed by the new deckhead and just west of it, you can see the old green-roofed deckhead.) From the new Deckhead Building, the ore was moved along to the Secondary Crushing Unit. (This building is barely discernible in the middle right of the photo because you are looking at the narrow end of the building, but you can see its shadow and the shadow of the conveyor leading to it.) From there, the ore went to the 7,000-ton Surge Pile (in middle of photo). A 42-inch Reclaiming Conveyor, running underneath the Surge Pile, forwarded the ore product to the Concentration Plant on the left of the picture. In the left foreground, you can see the beginning of the Trans-Island Conveyor that took the ore to the Scotia Pier on the south side of the Island. The large, low building in the foreground is the Bartlett Memorial Arena. You can see the 5 Company Staff Houses between the Arena and No. 3 Yard. Just east of the Arena is the old green-roofed Hoist House, which is still standing in 2020. The low building in the top center of the photo was the Warehouse. (See photos #72, 73 & 74 for other views of No. 3 Yard.)
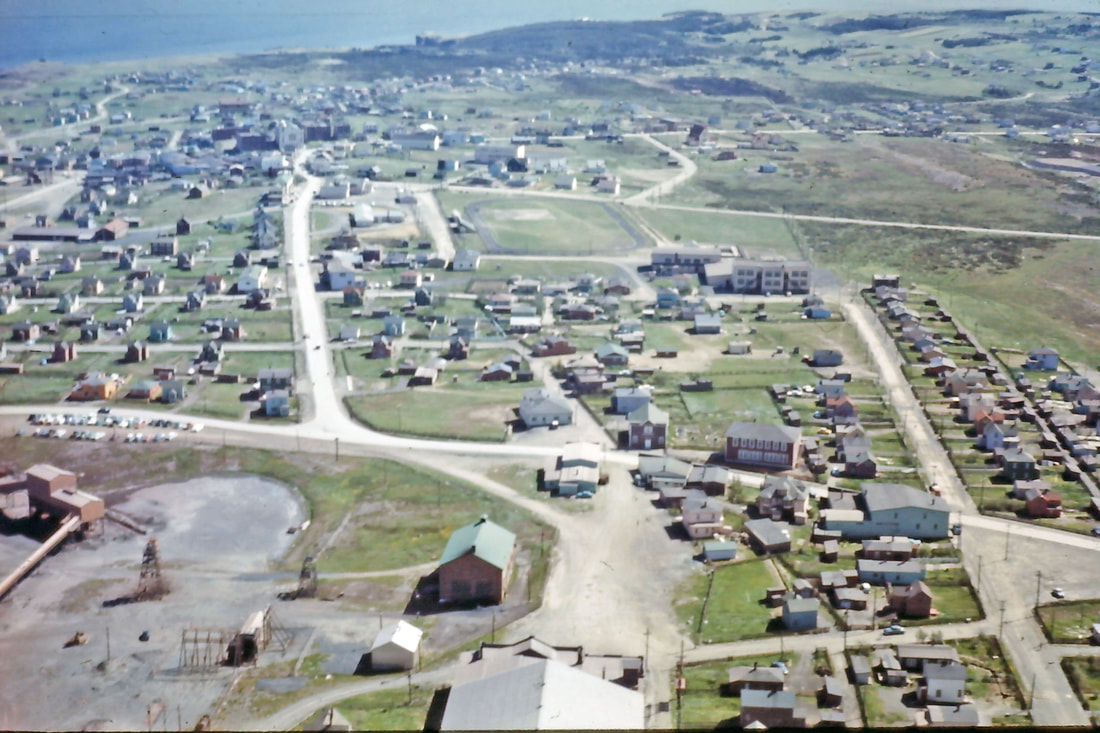
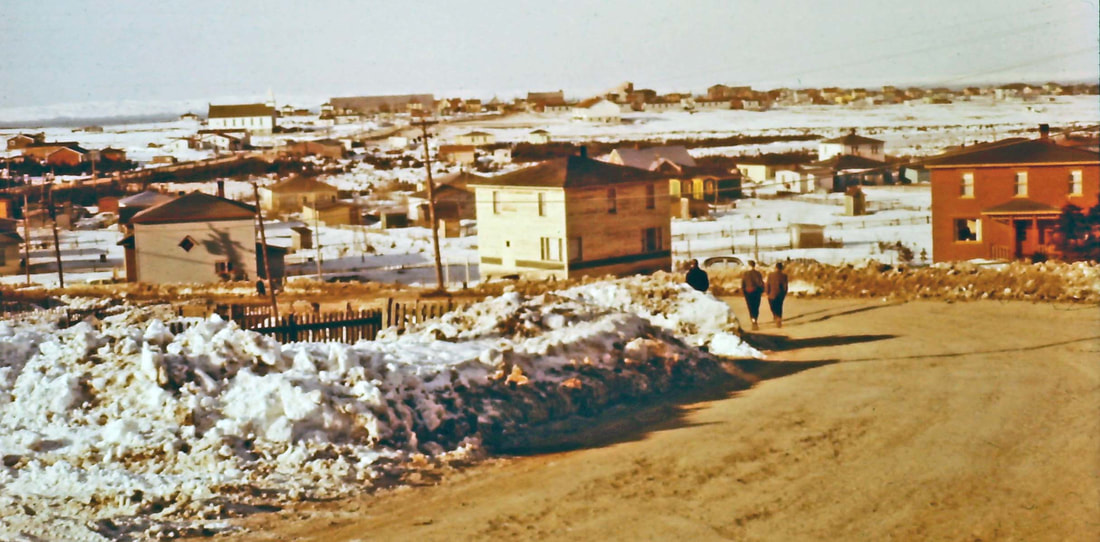
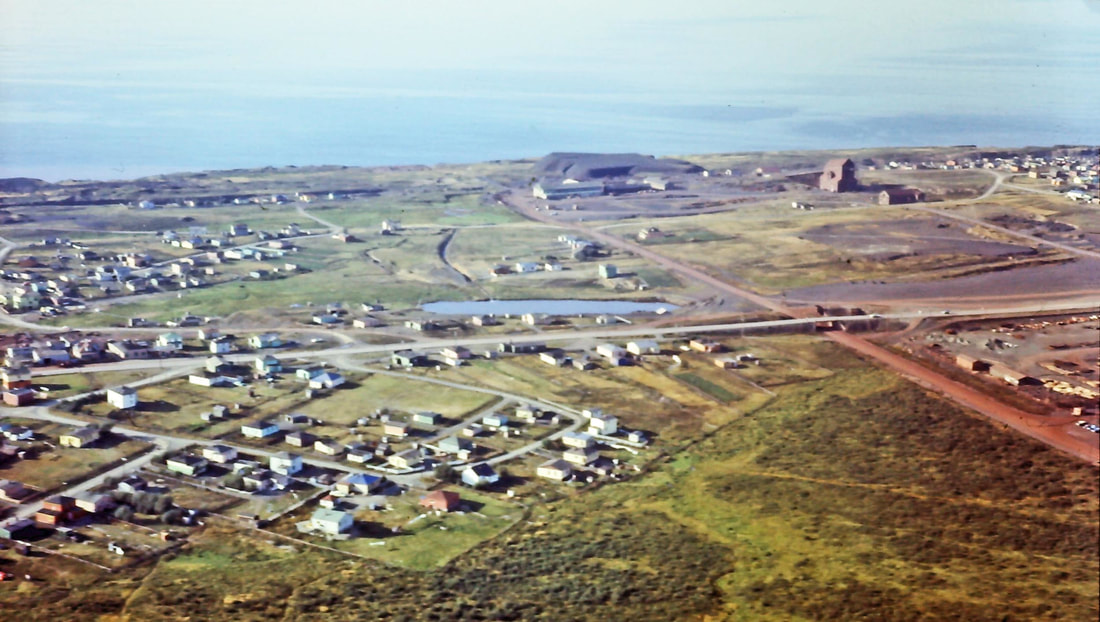
#19. Aerial view looking east from above the arena. Part of No. 3 Yard in the left foreground. Bennett Street runs east to Town Square in the center left of the picture. The Company houses of Dominion Range are to the north of Bennett. To the south of Bennett and No. 3 Yard are Company houses of Scotia Ridge.
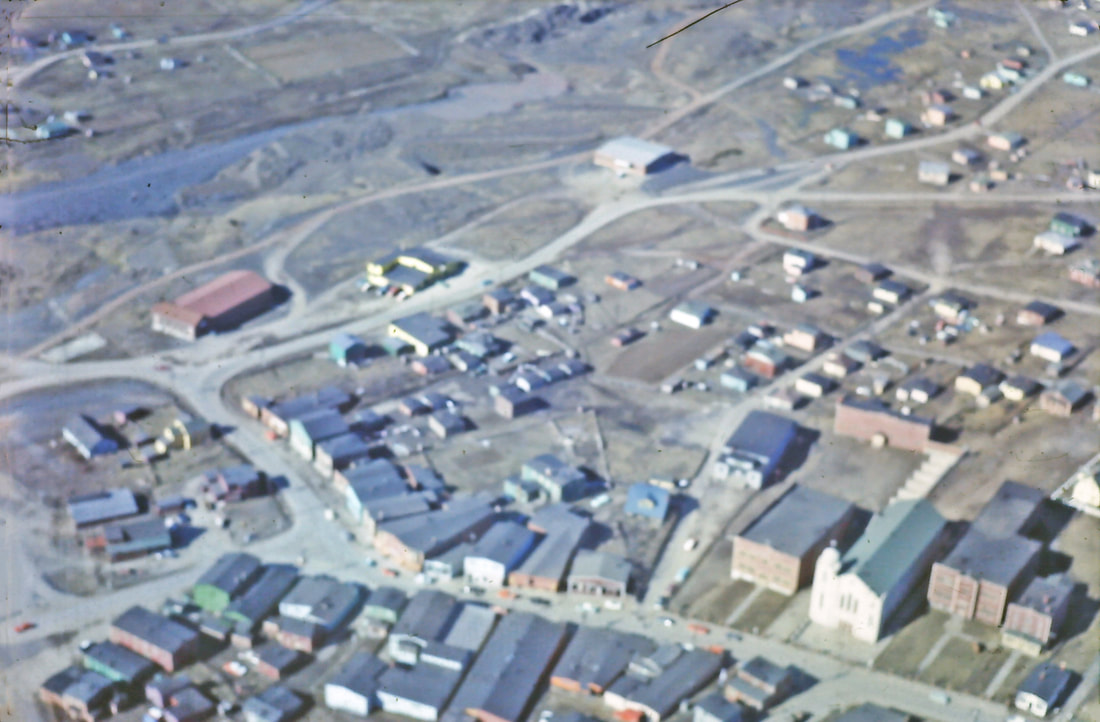
#20 Aerial view of Town Square.
#21 Looking south on Town Square from the intersection with Quigley's Line. William Somerton's Company house on the right (yellow).
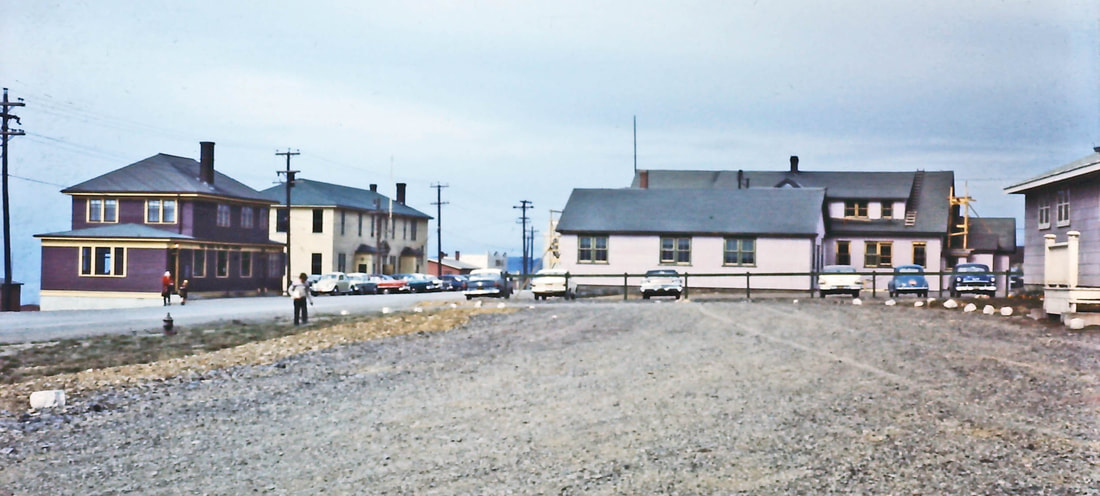
#22 Bennett Street on left. Buildings left to right: Bank of Nova Scotia (dark red); Public Building (cream colour. The west entrance was originally for the Post Office; it became the Public Library in 1959. The east entrance was originally for local police, taken over by RCMP in 1950, welfare office and Court House, on 2nd floor). The DOSCO Main Office is the large light-coloured building taking up the right side of the photo, with the new Staff Boarding House (grey colour, built in 1957) far right.
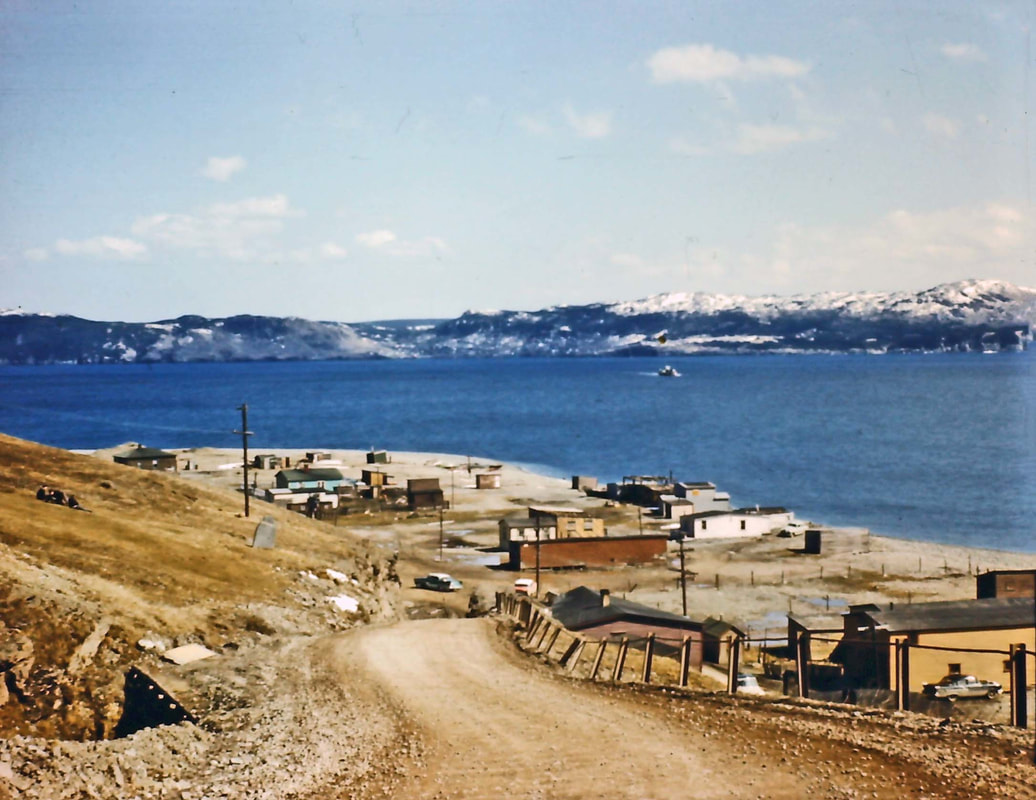
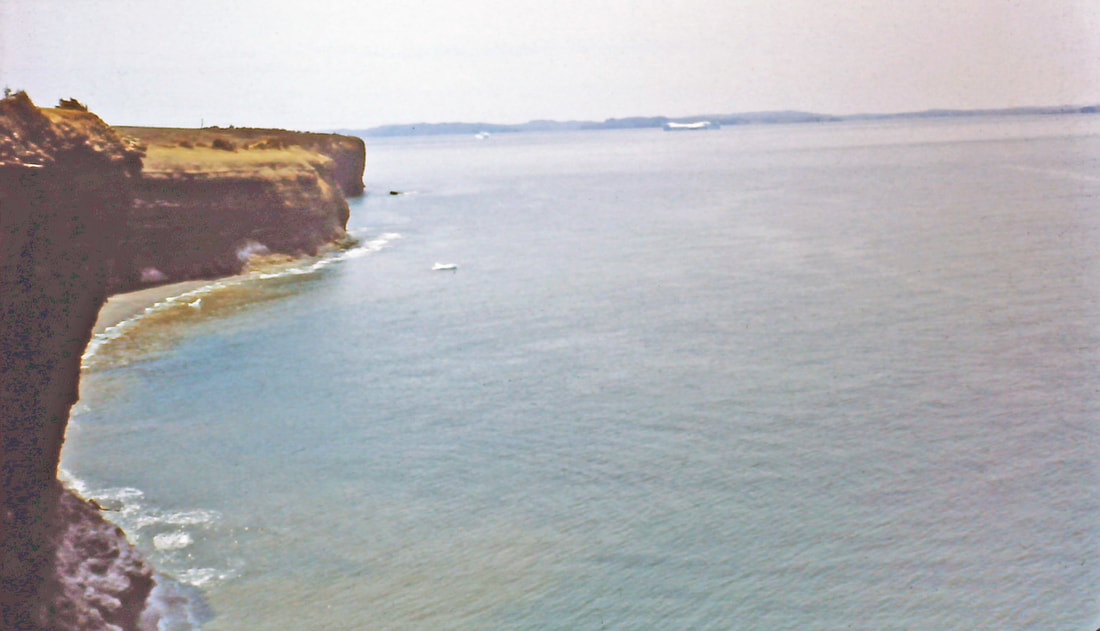
#23 Aerial view of the SE of the Island looking at The Beach and The Front as far west as Scotia Pier.
#24 Aerial view of the ferry dock at Portugal Cove, showing the breakwater.
#25 Aerial view of the ferry dock at Portugal Cove, showing the breakwater.
#26 Aerial view of Scotia Pier with an ore carrier loading. The ore stockpiles are on the right above the cliff. Lance Cove Road runs left to right through the middle of the picture, with Stewart's Bridge at the point where the road goes over the Scotia Ore Road. West Dam is seen in the left background.
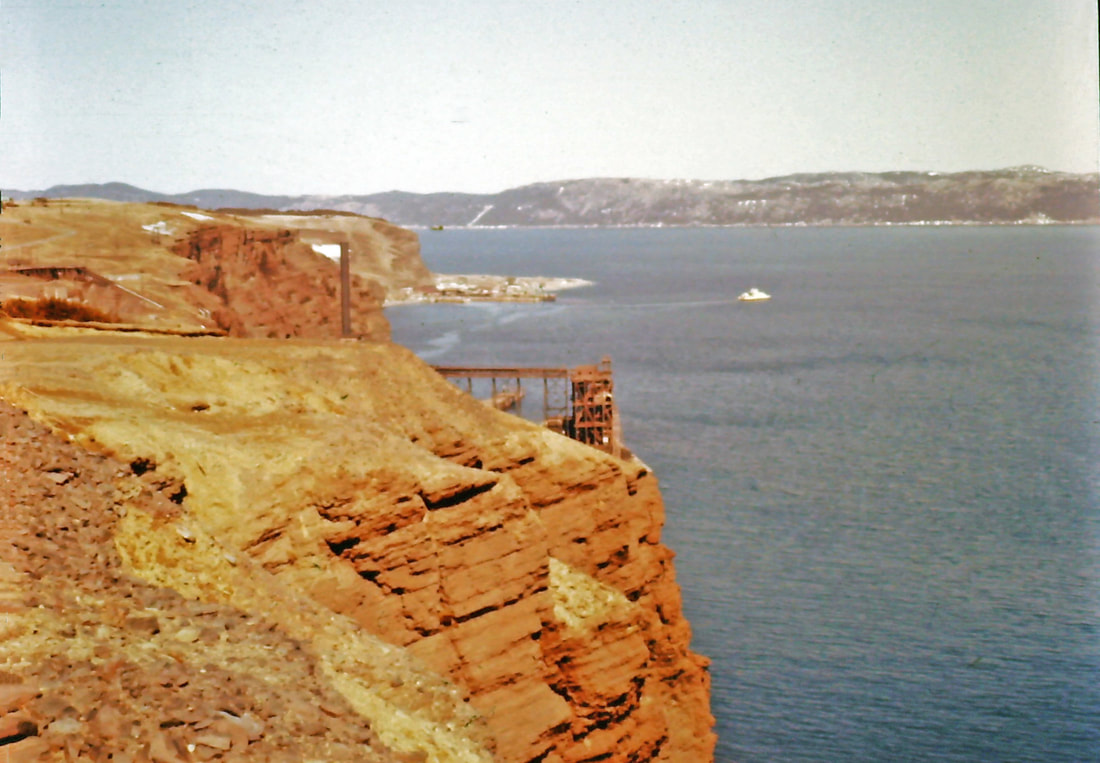
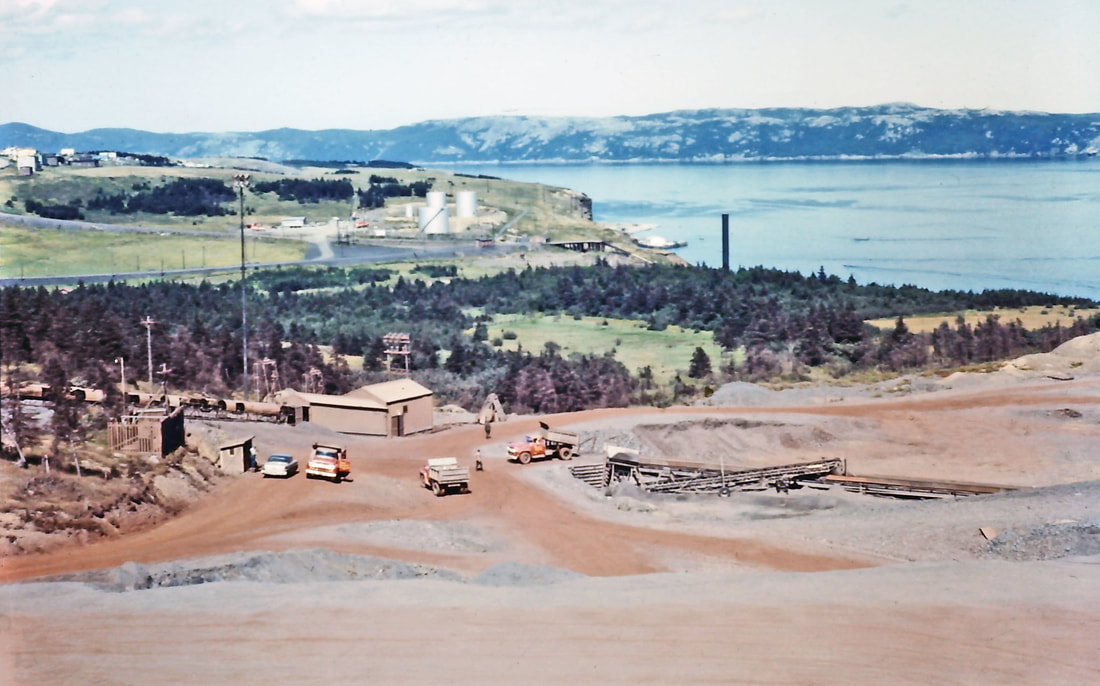
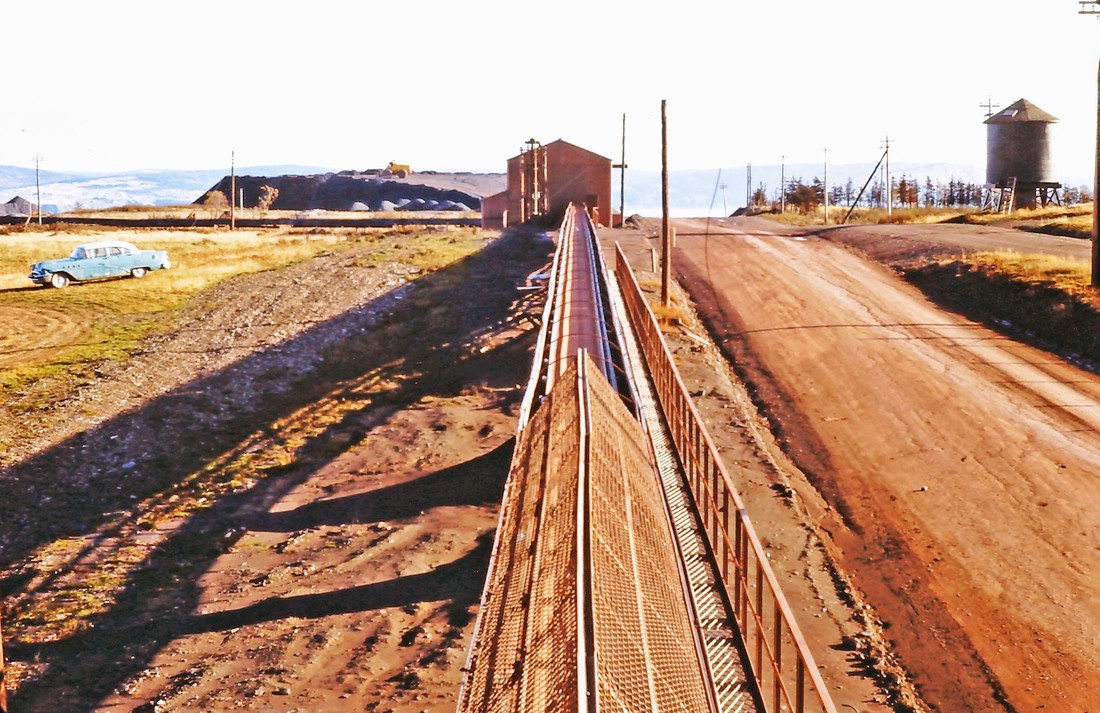
#27 Aerial view of Dominion Pier and the Steam Power House. See #51 below for an earlier close-up view of Dominion Pier and the Power House.
#28 No. 5 Surface Mine (immediately west of Air Strip and No. 4 Mine).
#29 The Machine Shop on the left, then the Forge Shop, Car Shop and Steel Shop in No. 6 Mine Yard. The little building in the far right background is the Time Office.
#30 The stockpiling area at Scotia Pier. L-R: unknown, Fred Rees, Jim Archibald.
#31 Cable Reel Shuttle Cars in No. 4 Mine Yard.
#32 Tom Kent, Superintendent of Nos. 4 and 6 Mines, at the No. 4 Change House.
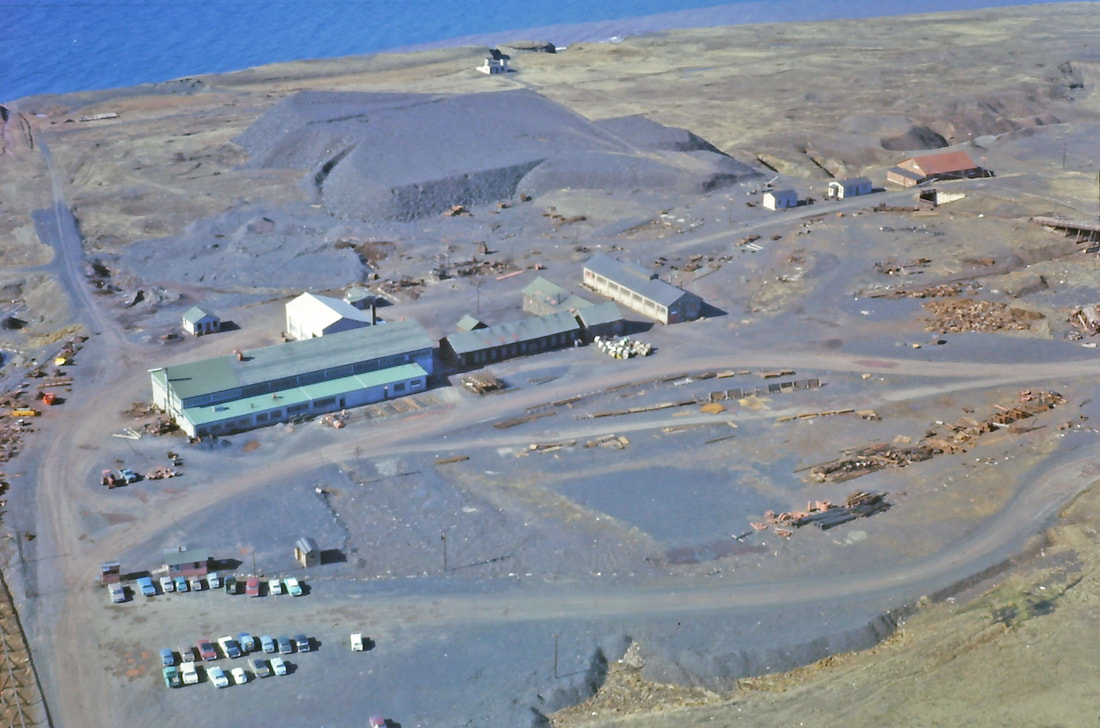
#33 Beneficiation Plant, Scotia Pier. On the horizon to the right, the long brown building is St. Michael's Church Hall, then St. Michael's RC Church, then St. Edward's RC School.
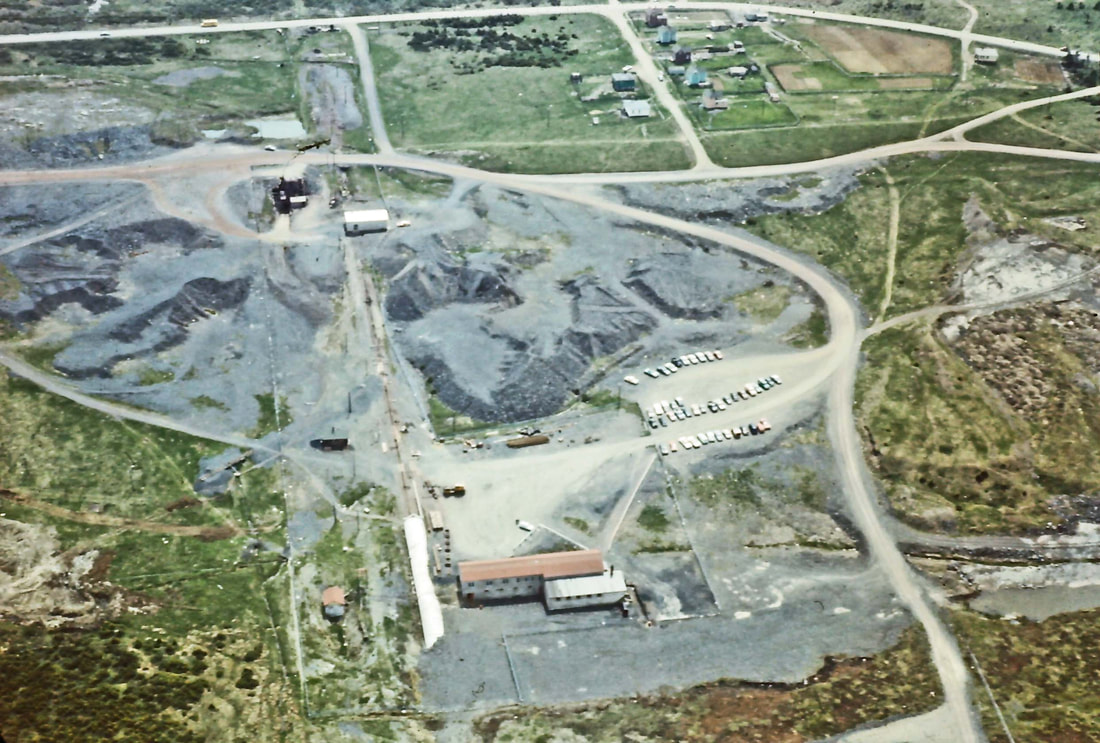
#34 No. 3 Mine Yard viewed from the west.
#35 Scotia Pier area.
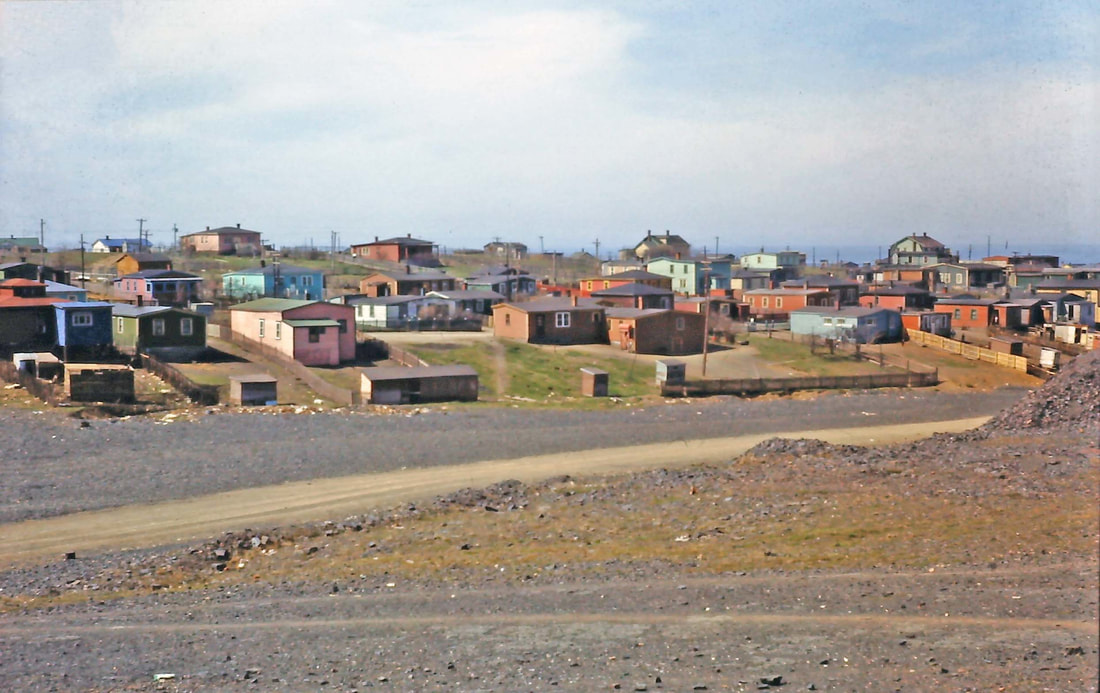
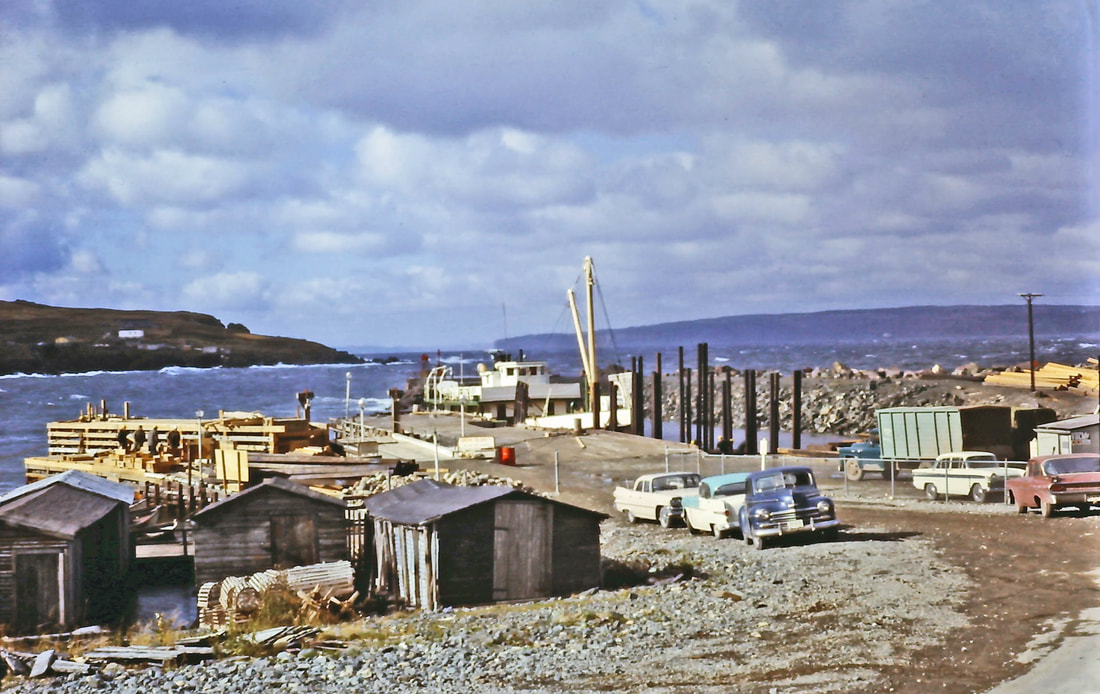
#36 No. 3 Mine Yard looking north, with 10 Commandments Range Company houses in the right of photo.
#37 No. 6 Mine Yard viewed from the west.
#38 The western end of No. 3 Mine Yard with the Warehouse on the right and No. 6 Deck Head on the left horizon.
#39 No. 3 Mine Yard. The green building is the gate house. Behind it is the dryhouse. Behind that is the new deckhead building.
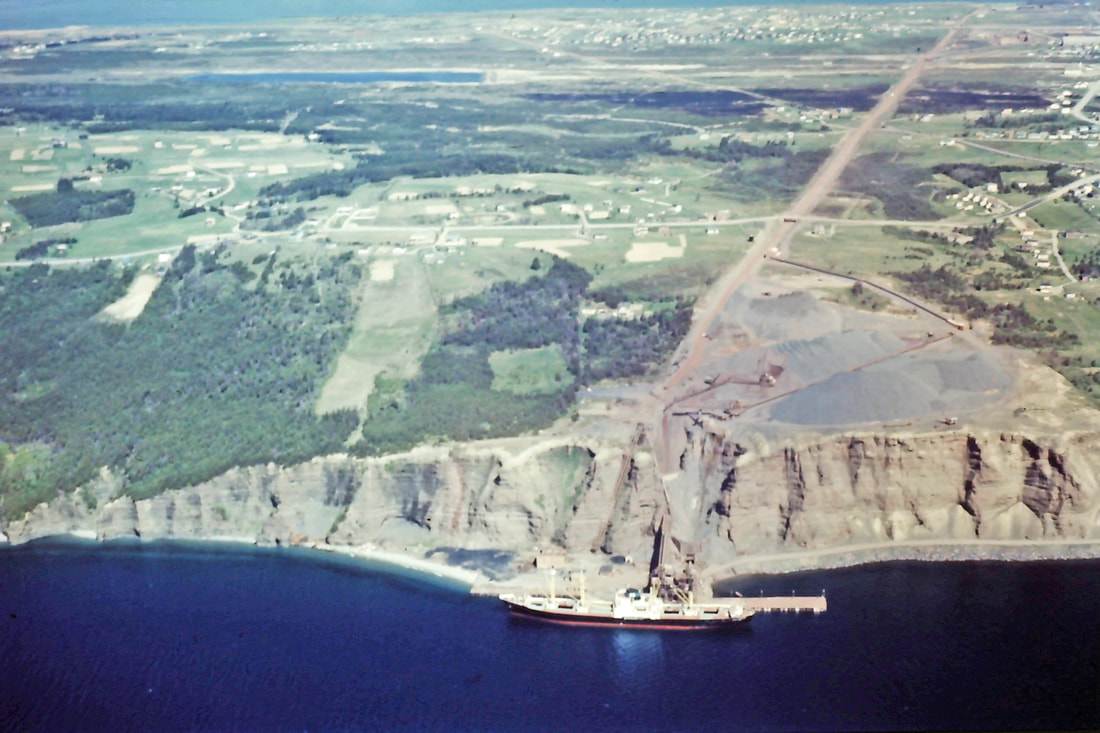
#40 Stockpiling Area at Scotia Pier. Dominion Pier is just to the right of the oil tanks in the top center of photo.
#41 Portugal Cove.
#42 Coastline at the Back of Bell Island.

#43 No. 5 Surface Mine (immediately west of Air Strip and No. 4 Mine). The sea stack in the far left is at Grebe's Nest.
#44 No. 5 Surface Mine area with Grebe's Nest sea stack and Cape St. Francis in the distance to the east.
#45 No. 5 Surface Mine (immediately west of Air Strip and No. 4 Mine).
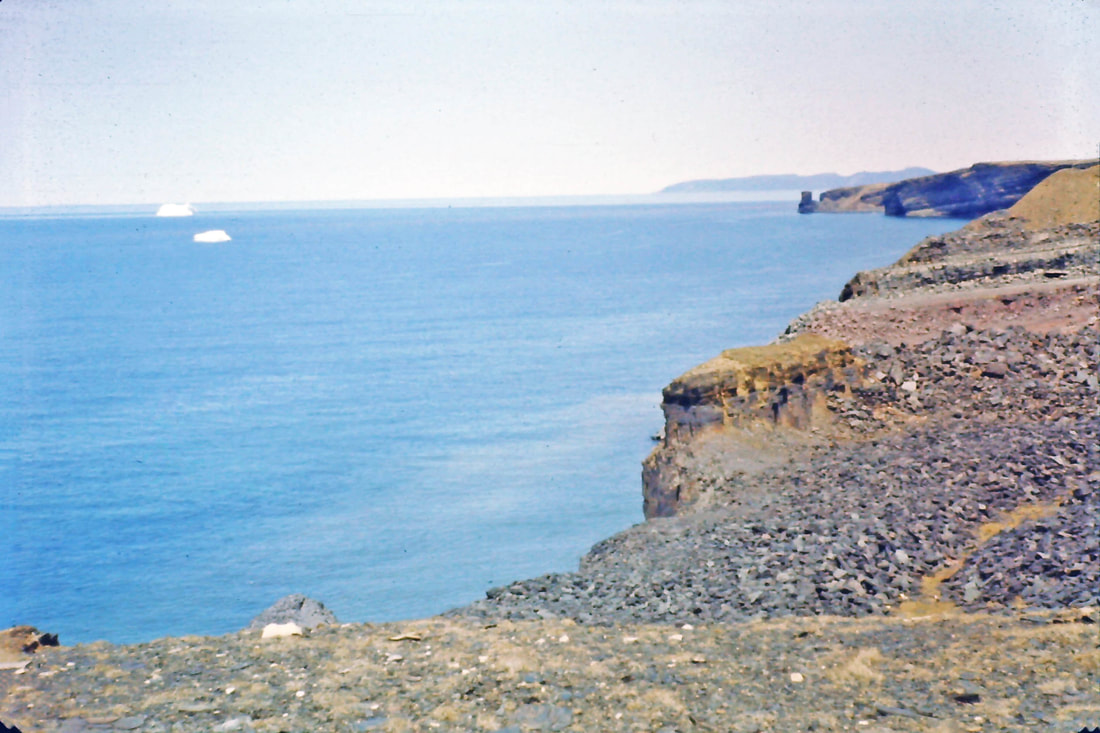
#46 No. 5 Surface Mine (immediately west of Air Strip and No. 4 Mine). Grebe's Nest sea stack in the distance.

#47 No. 3 Mine Yard looking towards the northwest.
#48 Dominion Pier with The Beach in the distance.
#49 Transfer House under construction at Scotia Pier. Stewart's Bridge is seen in the background to the left of the construction.
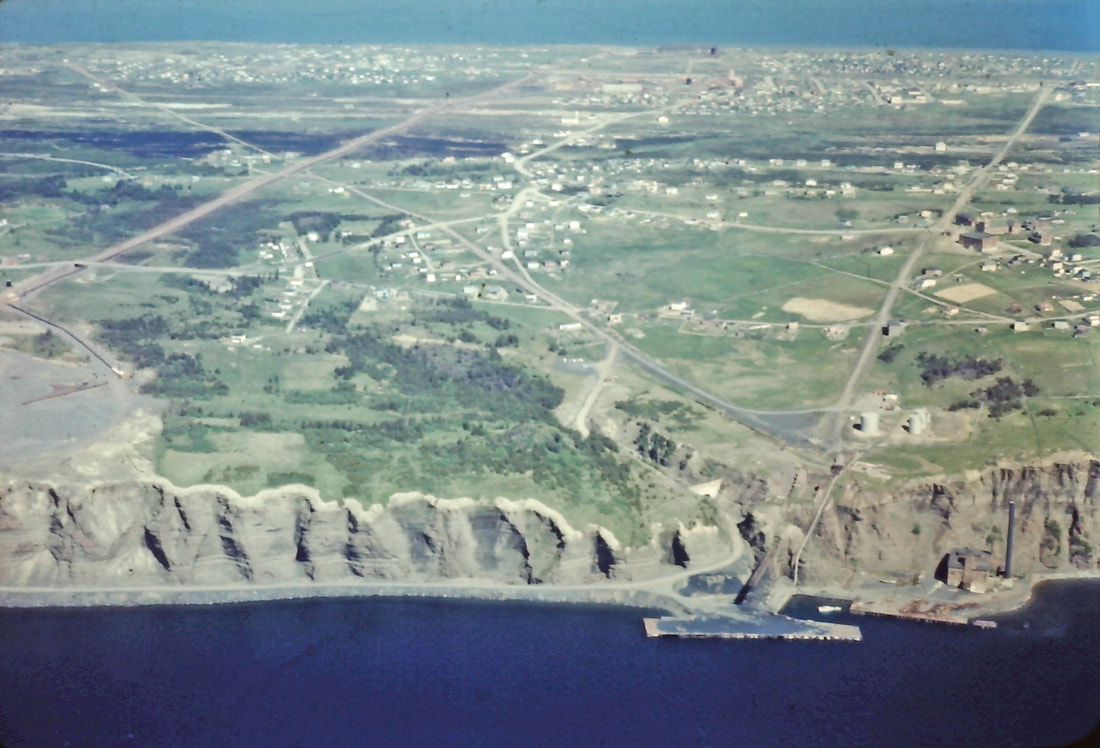
#50 Discharge Conveyor from Screening Plant at Scotia Pier area. St. Michael's RC Church and St. Edward's Convent School are seen on the horizon in the upper left corner.
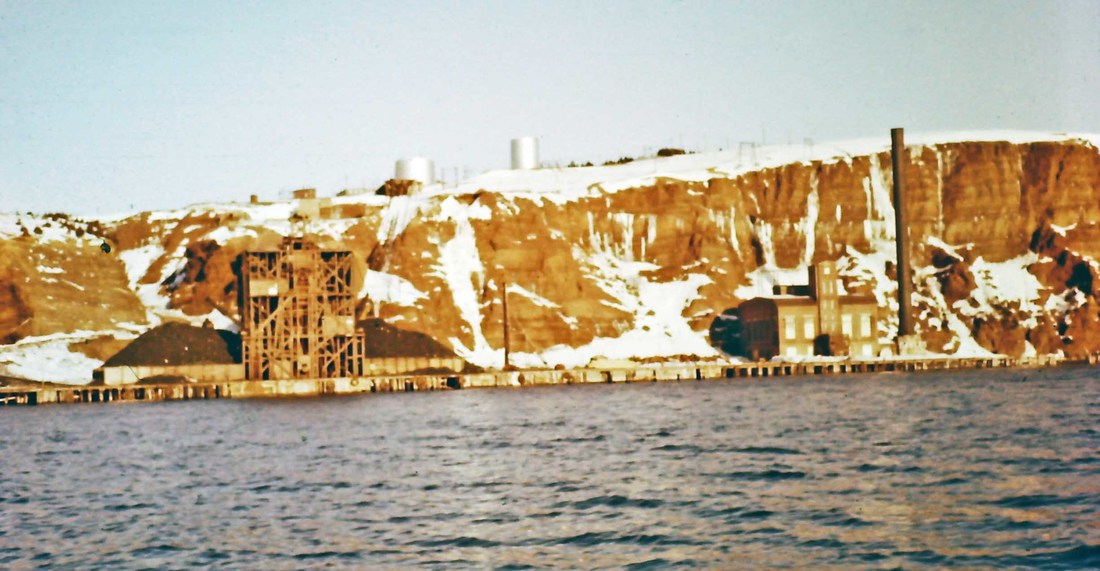
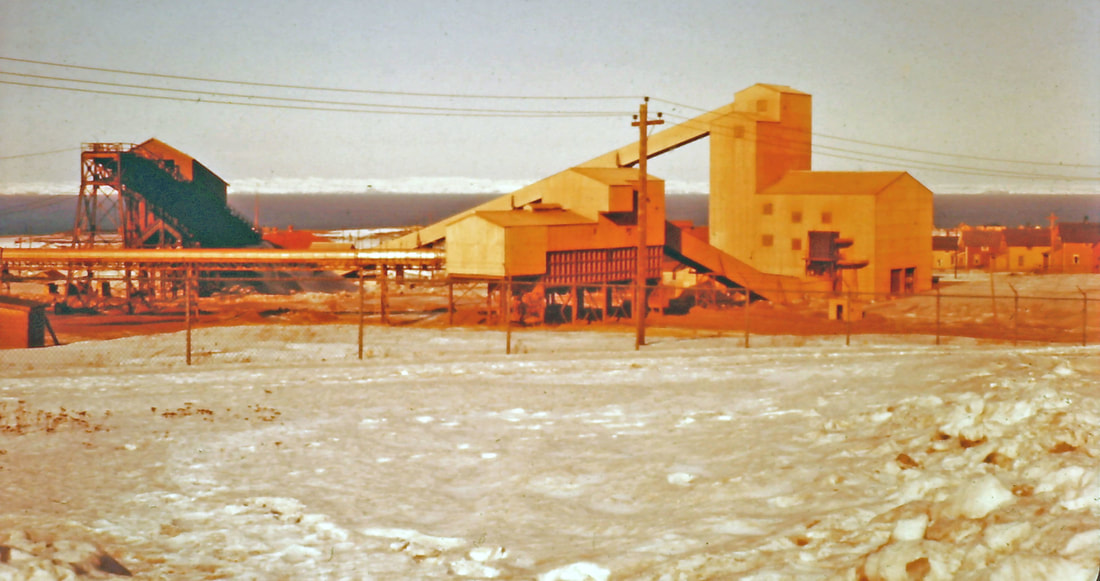
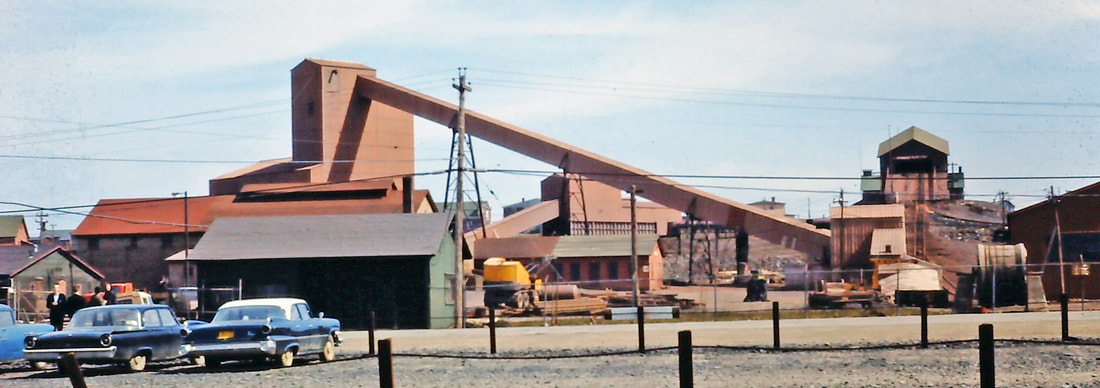
#51 Dominion Pier and the steam Power Plant. The structure in the left of the photo was the ore loading tower; it was demolished in the spring of 1959 (source: Submarine Miner, May 1959, p. 8.)
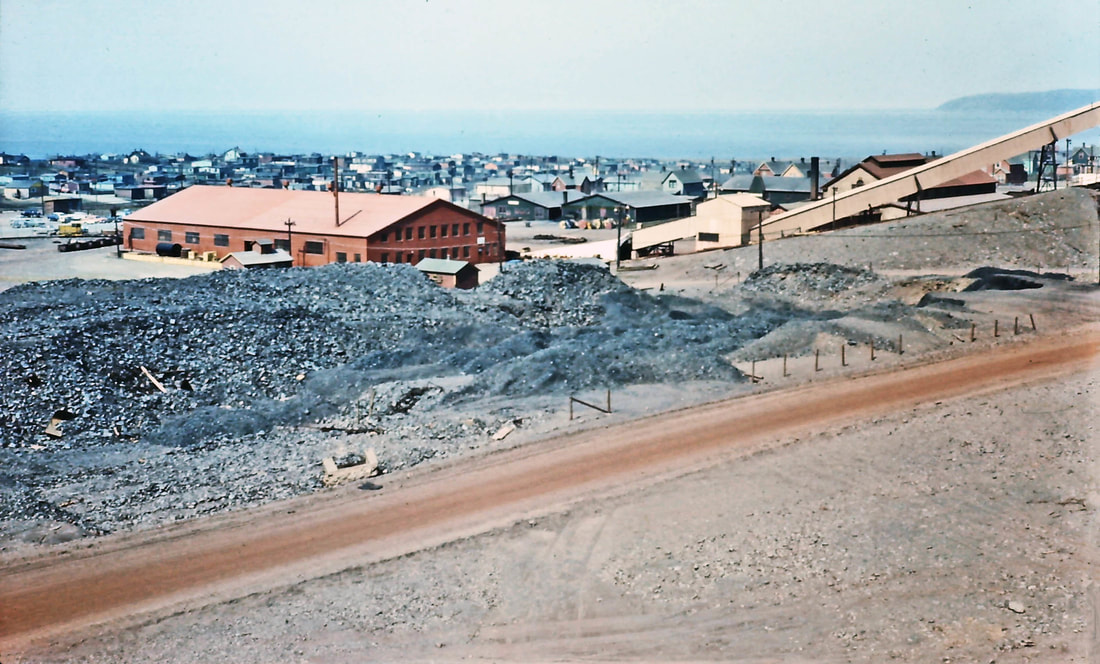
#52 Warehouse in No. 3 Mine Yard with The Green in the background.
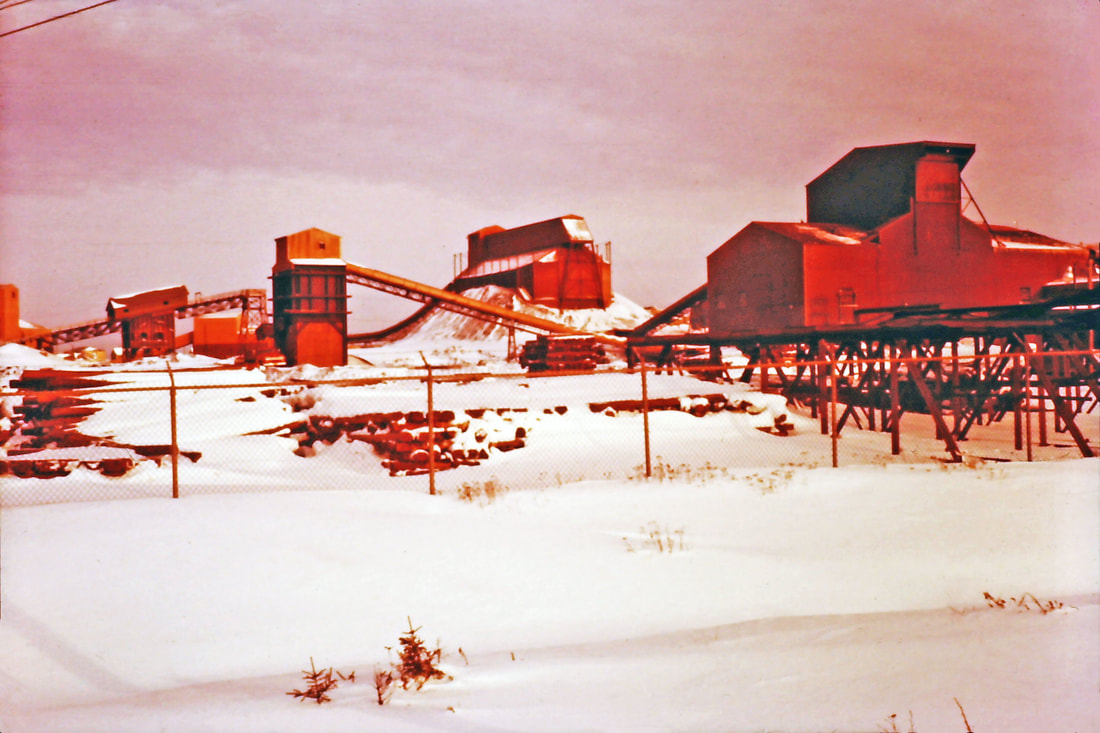
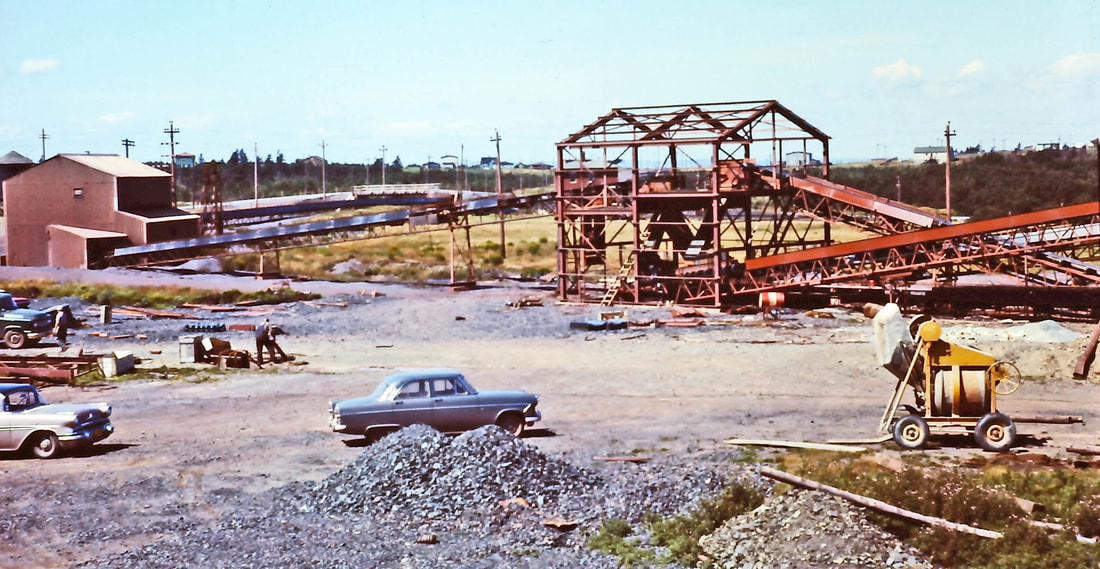
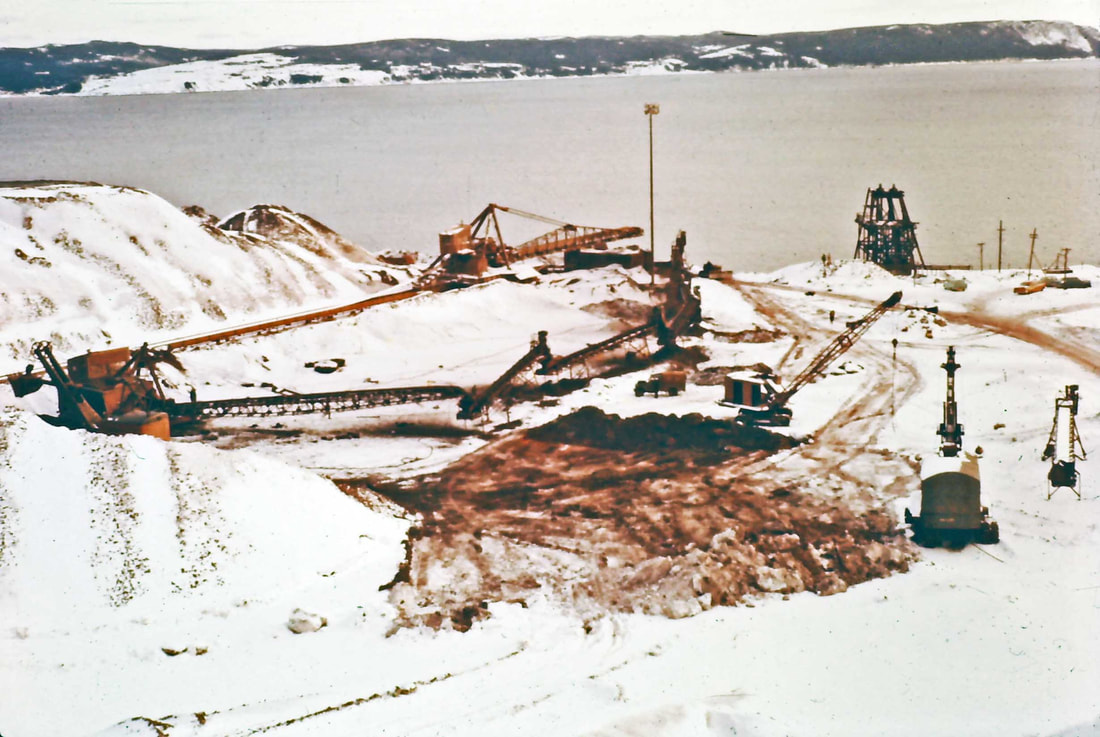
#53 Screening Plant under construction, Scotia Pier.
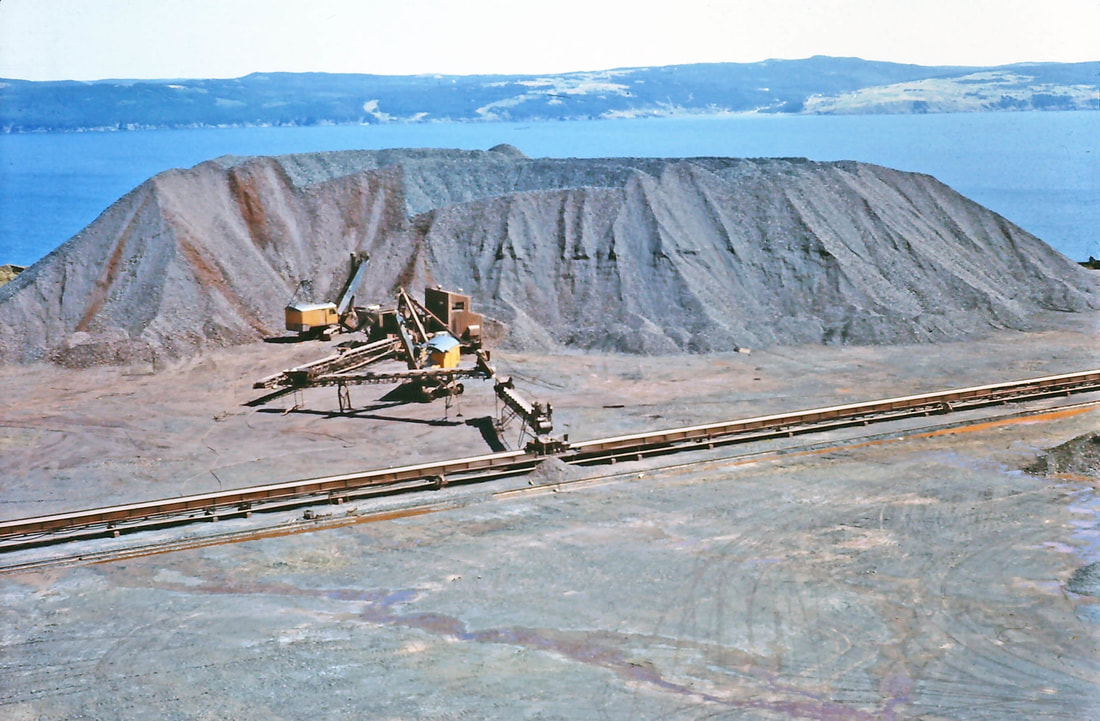
#54 Stockpiling Area at Scotia Pier.
#55 Portable Stackers at Scotia Pier stockpiling area.
#56 Conveyor Belt, Scotia Pier stockpiling area.
#57 Construction Road leading to Sizing Plant, Scotia Pier area. In the middle background is the oil tank farm on Martin's Hill, with Dominion Pier to the right of that. The smoke stack is from the Steam Power Plant at Dominion Pier.
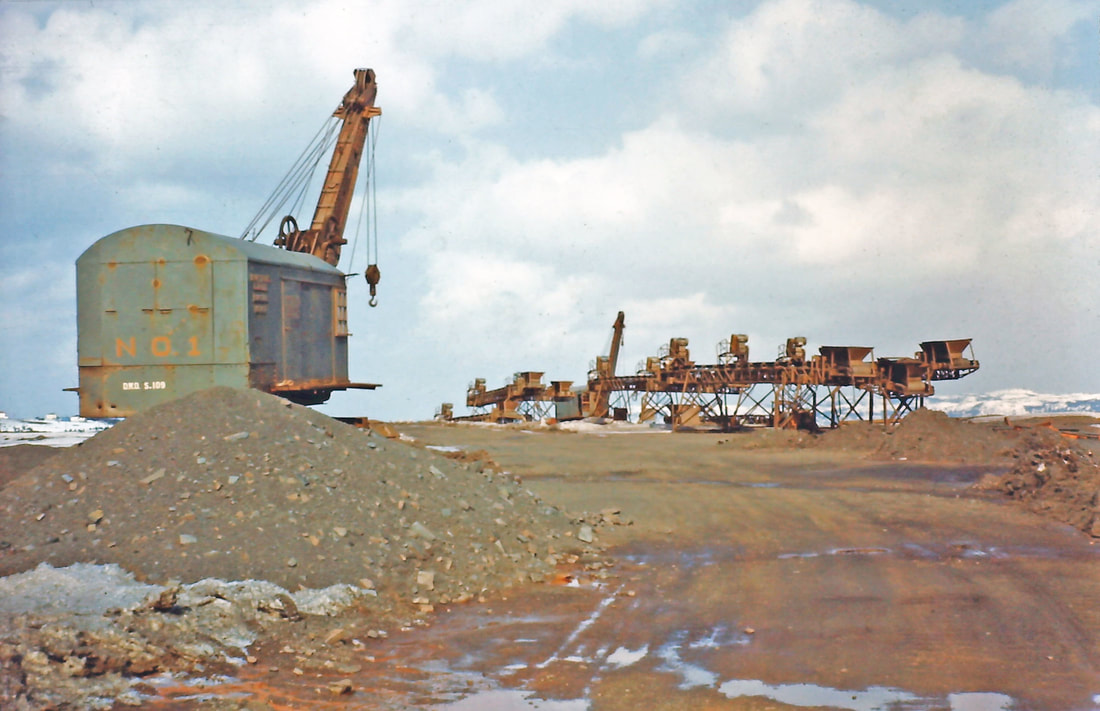
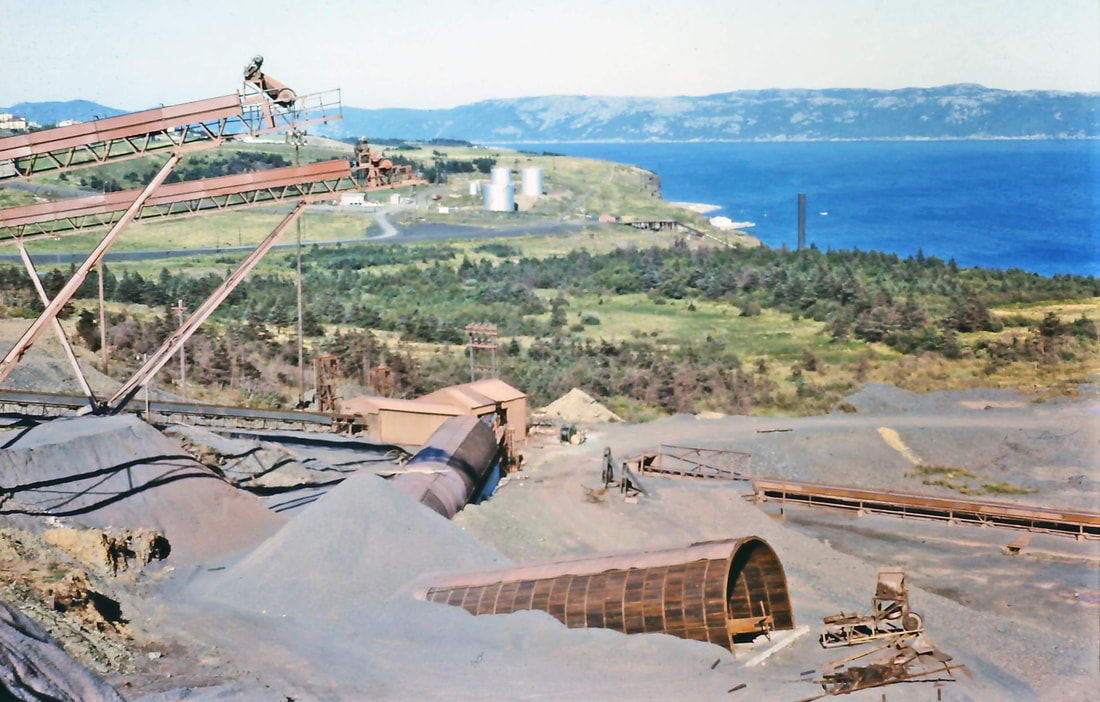
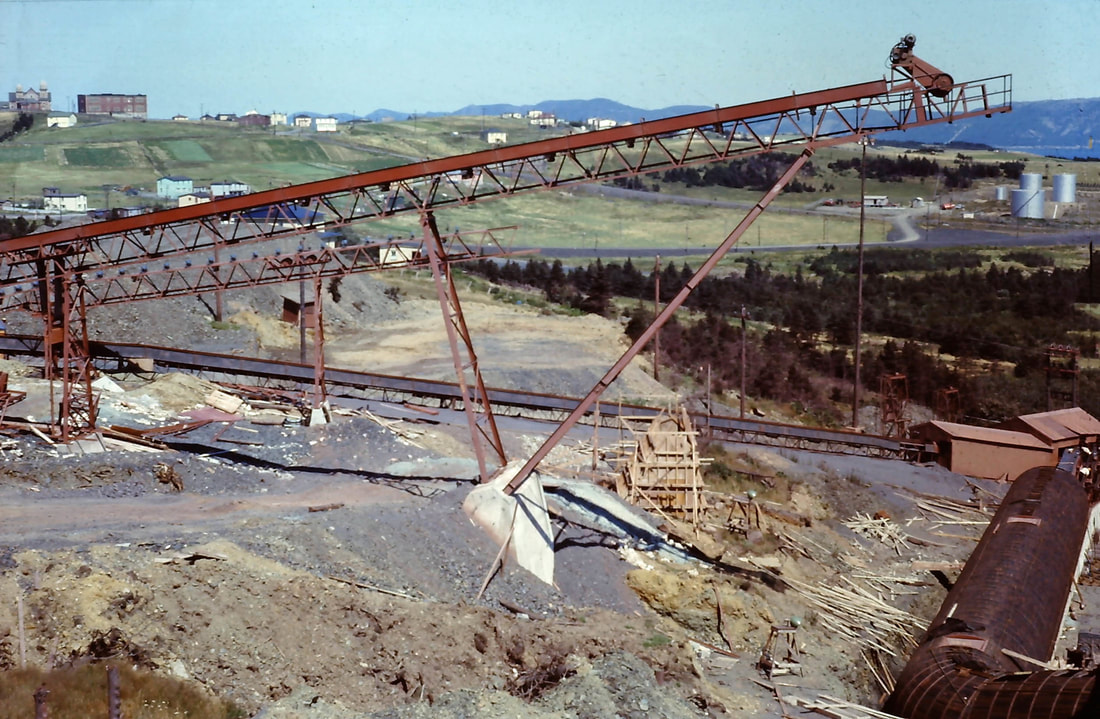
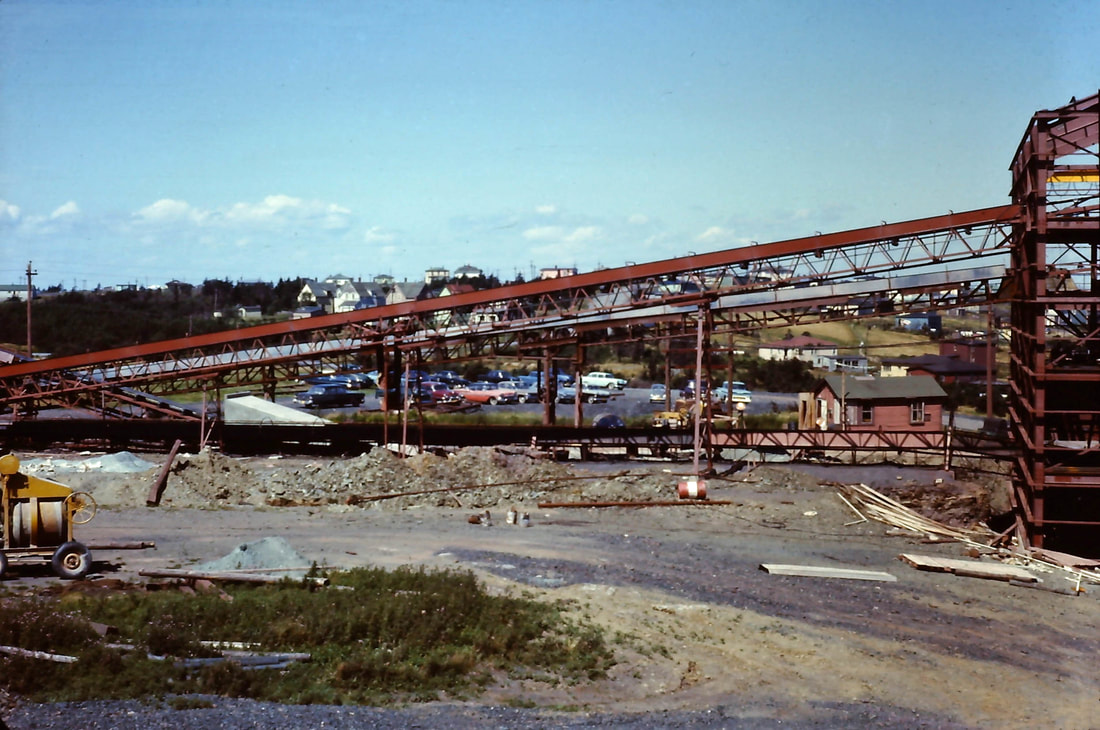
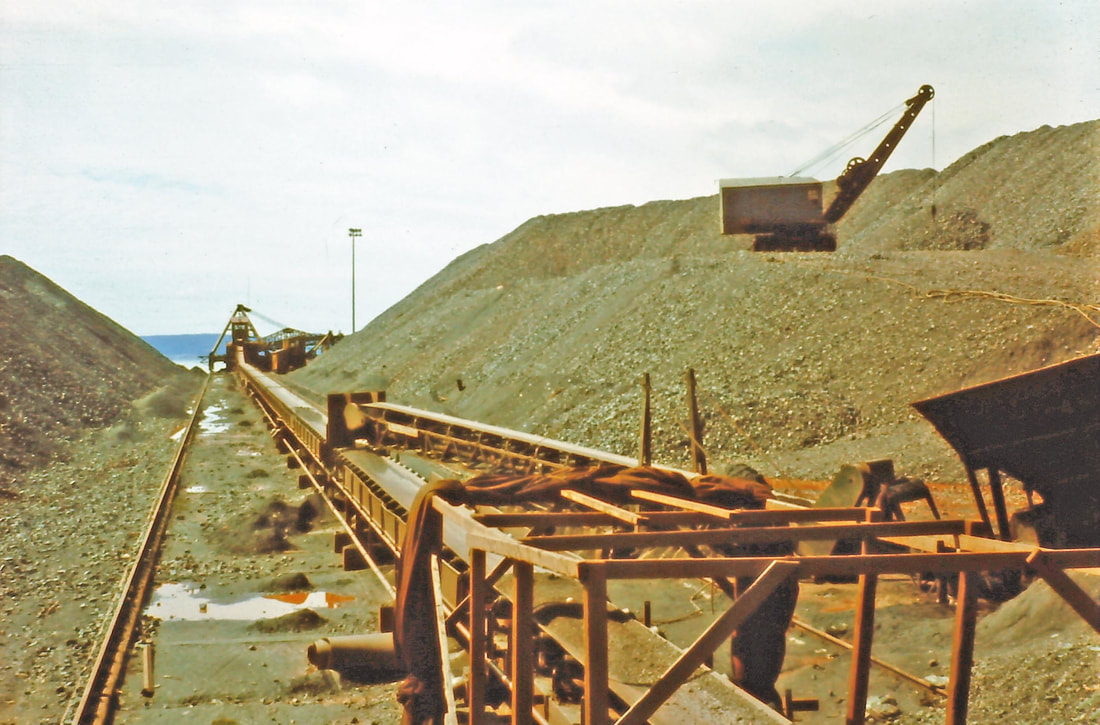
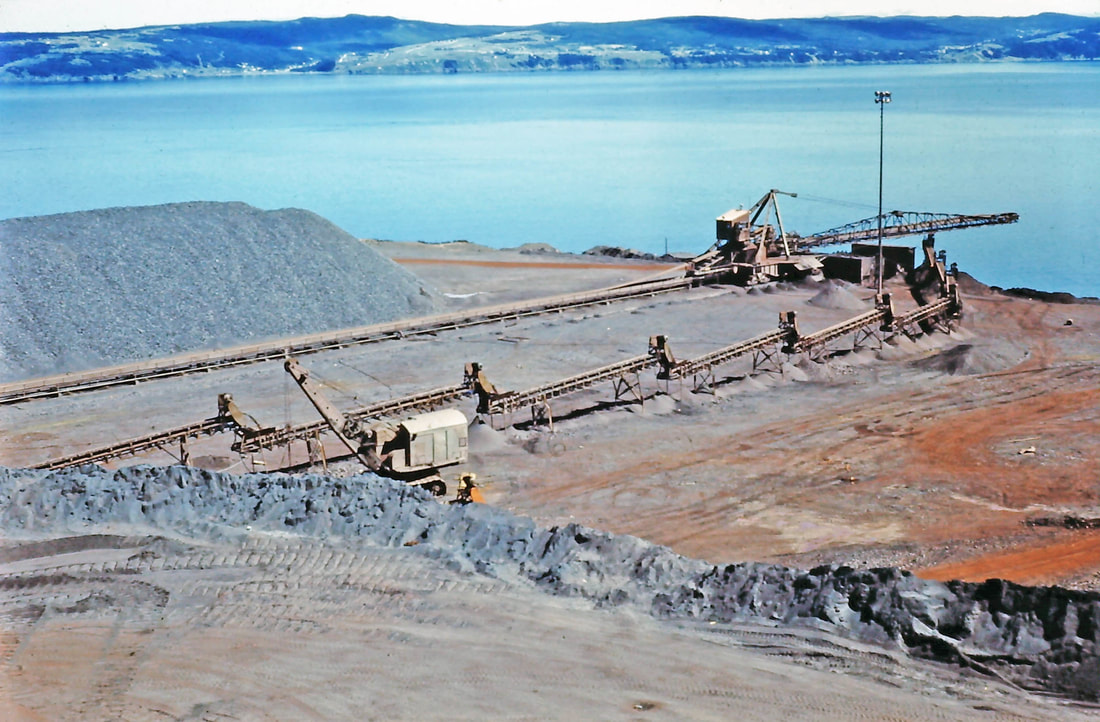
#58 Ore Road & Conveyor Belt at Scotia Pier.
#59 There are a total of 87 slides in this collection housed at Archives and Special Collections division of MUN Library. Originally, there were 92 slides, but 5 were missing at the time they were donated to the MUN Library. #59 is one of the missing five. The caption ascribed to slide #59 on the list that accompanied the slide donation reads, "Truck loading on Kipawo, Hard over Hard."
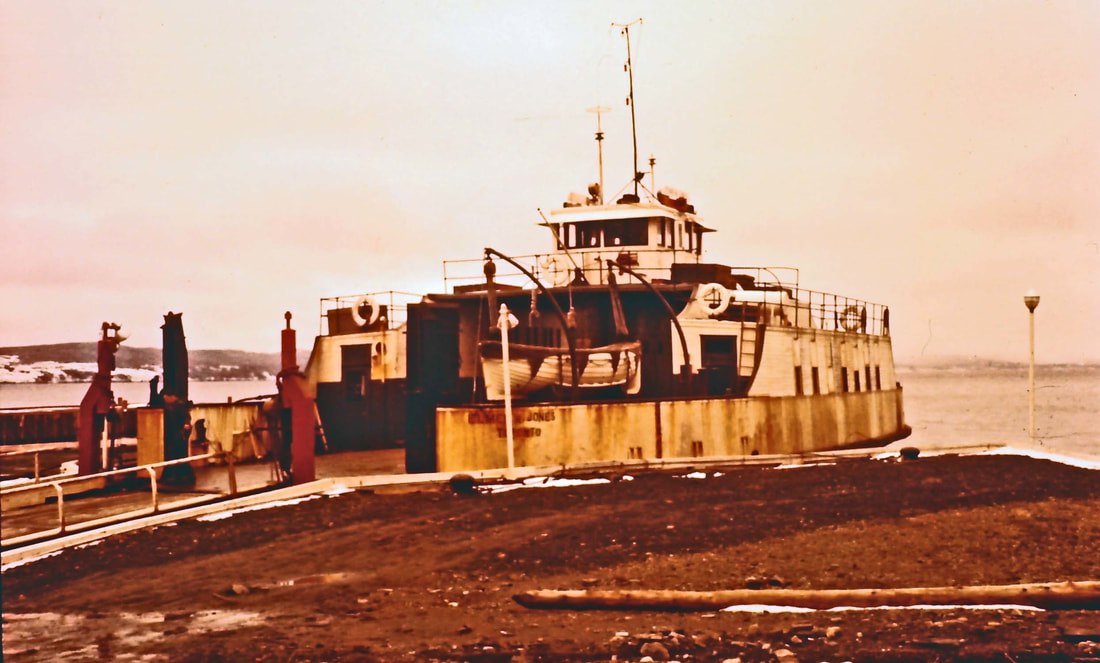
#60 The MV Elmer Jones started on The Tickle in 1955. She had a capacity for 12 cars and 3 trucks and was reinforced for operation in ice. She was retired from the service when the John Guy began operating in 1960.
#61 Portugal Cove, Ferry Dock under construction, Kipawo arriving, c.1960.
#62 Portugal Cove c.1960 with iceberg in distance.
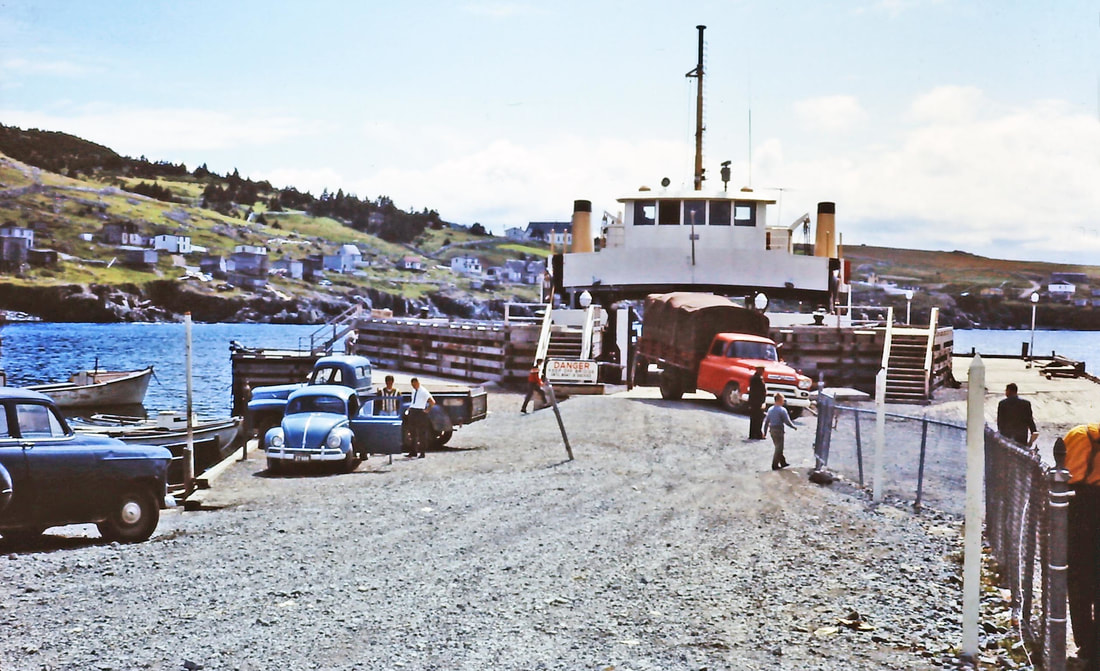
#63 The ferry, John Guy, loading at Portugal Cove. With a 24-car capacity, she was launched May 12, 1960 at Pictou Shipyard, Nova Scotia, and travelled to Bell Island in August 1960 to begin serving The Tickle on the 24th.
#64 The ferry John Guy docked at Bell Island; arctic ice in The Tickle. The ferry was constructed of welded steel for ice-breaking.
#65 Aerial view of Dominion Pier and mid-section of Bell Island.
#66 Aerial view of The Beach and mid-section of Bell Island.
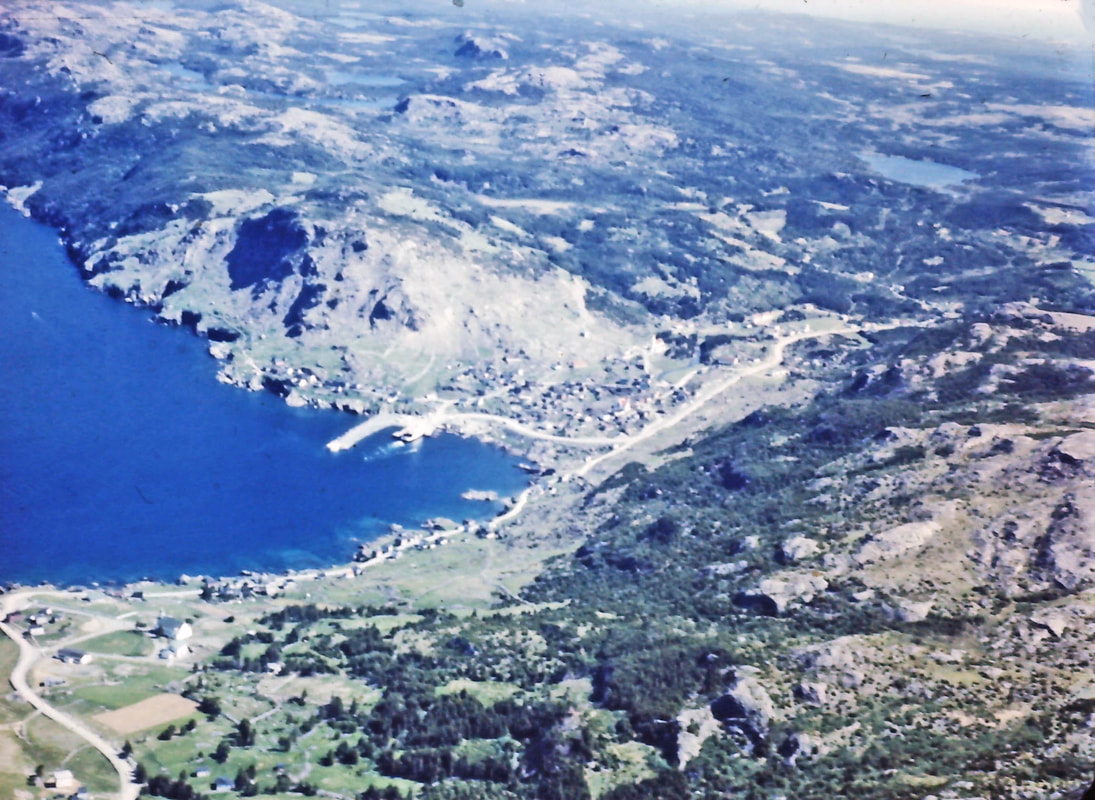
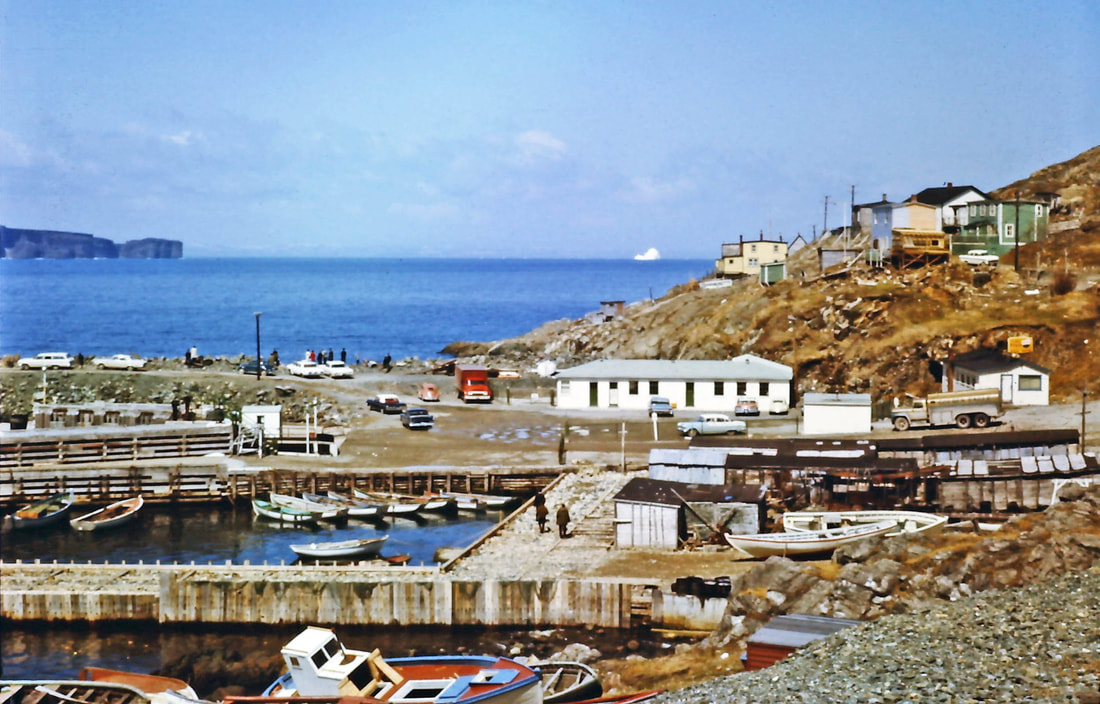
#67 Aerial view of the East End of Bell Island.
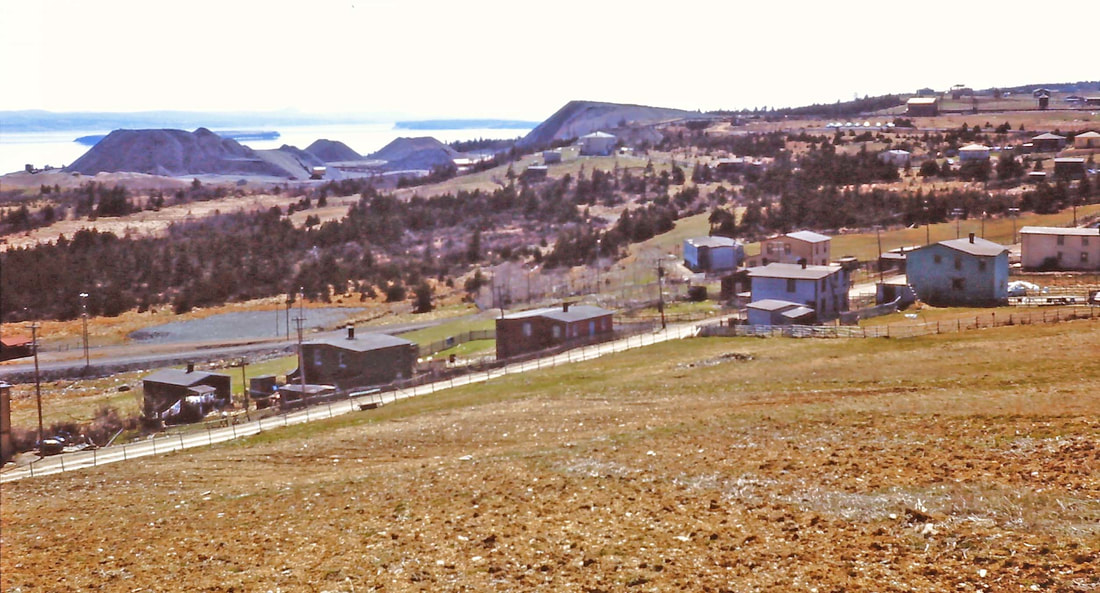
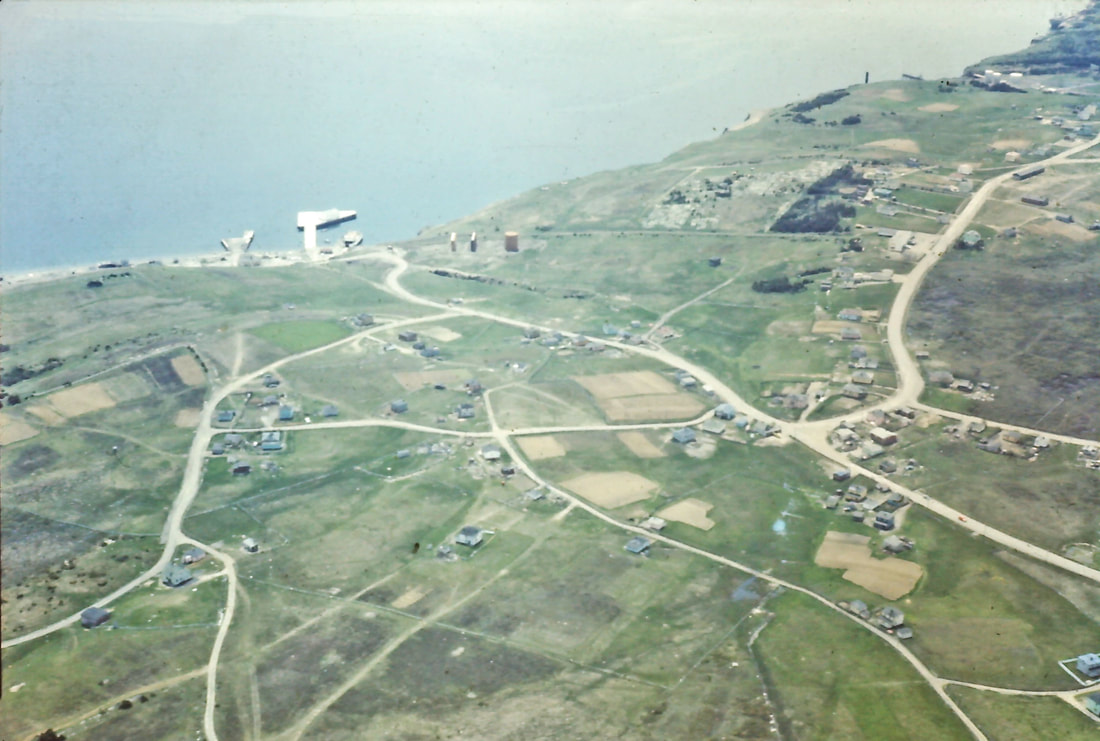
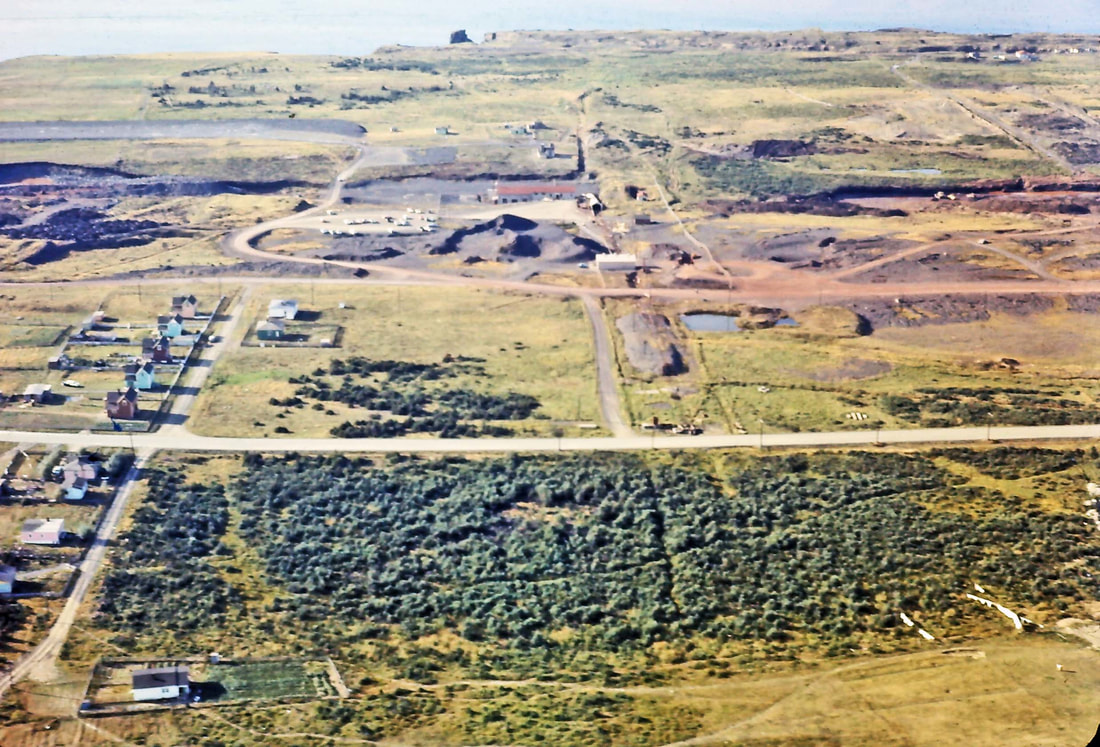
#68 Aerial view of No. 6 Mine Yard in center background. The Scotia Ore Road runs from No. 6 out the right of the photo past the northwest end of No. 3 Yard. The pond in the center is 44-40. West Mines Road runs left to right through the center of the photo. The left side of the photo shows houses in the West Mines section of Bell Island. In the background of the left side of the photo is the outcrop from early surface mining. Some of the houses of The Green can be seen in the top right corner.
#69 A closer view of No. 6 Mine Yard with the Machine Shop on the left. The large mound is waste rock separated from the iron ore as it came out of the mine.
#70 Aerial View of No. 4 Mine Yard in the upper center of the photo. Just west of No. 4, the workings of the short-lived No. 5 Surface Mine can be seen. North of that is the air strip. West Mines Road runs left to right through the middle of the photo. The five one and one-half storey houses in the left center are Dominion Company houses on McDonald Street.
#71 No. 4 Mine Yard as seen from the north. The white strip in the bottom center of the photo is the mine collar. Beside it is the Dryhouse. McDonald Street of Company houses is in the top of photo.
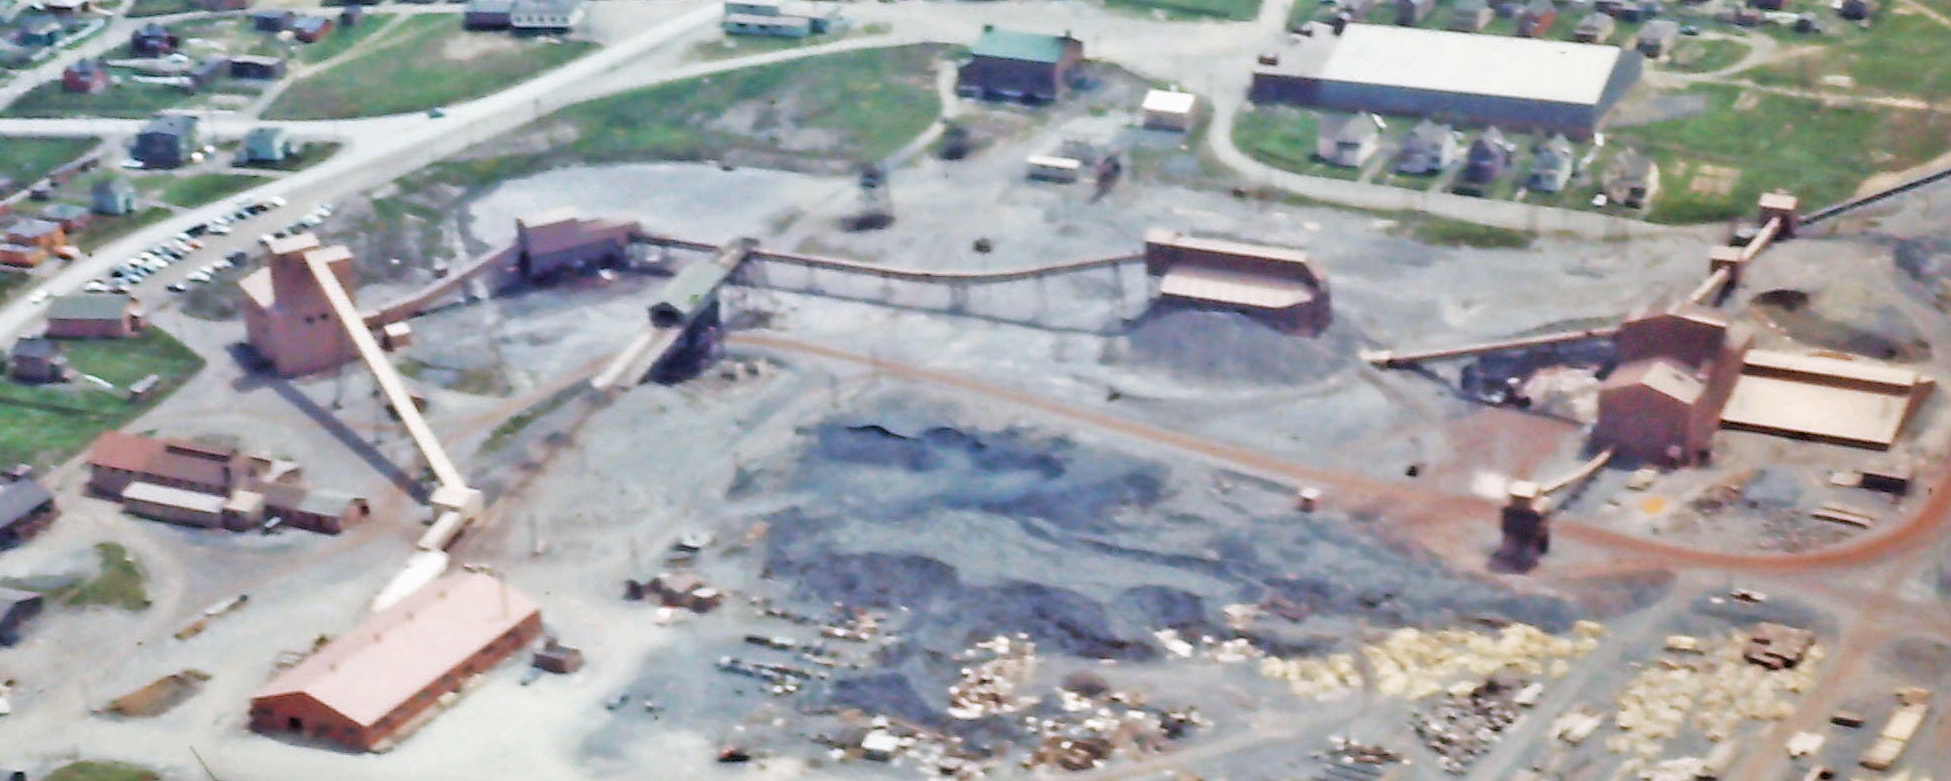
#72 Aerial view of No. 3 Mine Yard viewed from the north. 10 Commandments Range/Davidson Avenue is the road on the left, the Scotia Ore Road can be seen across the top right corner, and West Mines Road goes left to right through the foreground. Below is a cropped version with a little more contrast to highlight the No. 3 Mine Yard structures.
#72-cropped version. See description below in #73-cropped version. There are 2 similar-size buildings in the bottom left corner of the Yard. The one closest to the bottom of the photo was the Carpenter & Cable Shop in 1954. The next one to it was a Bunk House. The building at right angles to that building was a Bunk House and Lunch Room. The long building at right angles to that building was the Dry House/Wash Room. The smaller building attached to the Dry House and closest to the Mine Collar was the Lamp Room. (See #73-cropped version below for descriptions of the other structures in No. 3 Yard.)
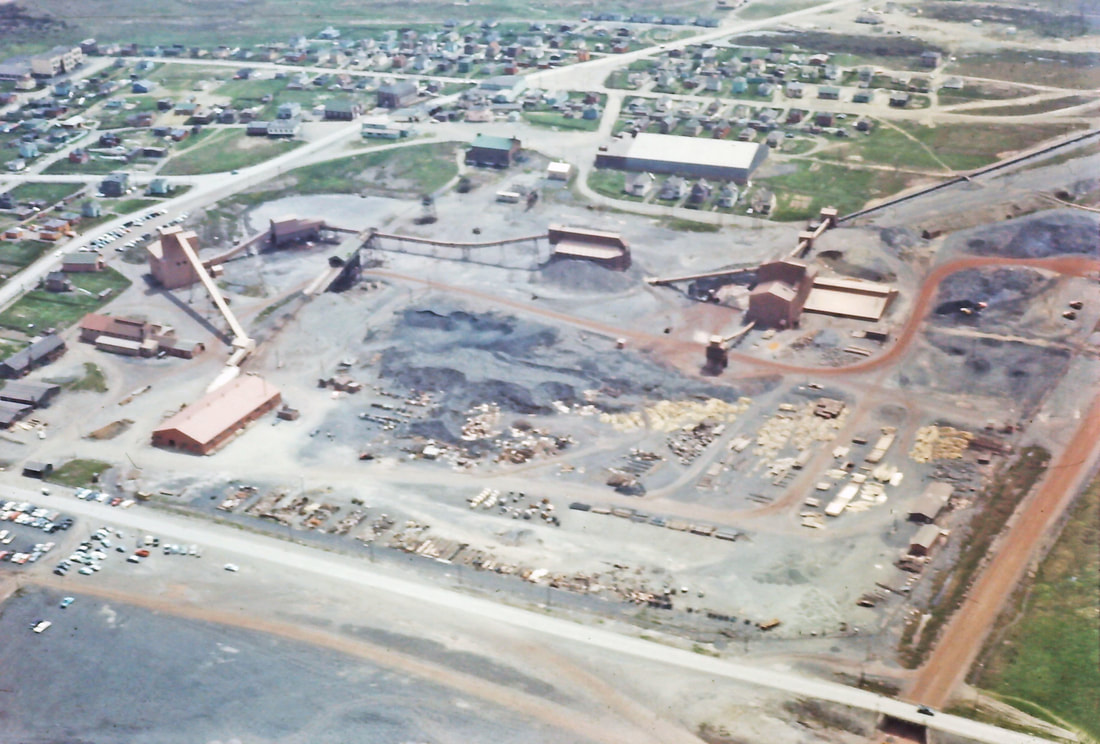
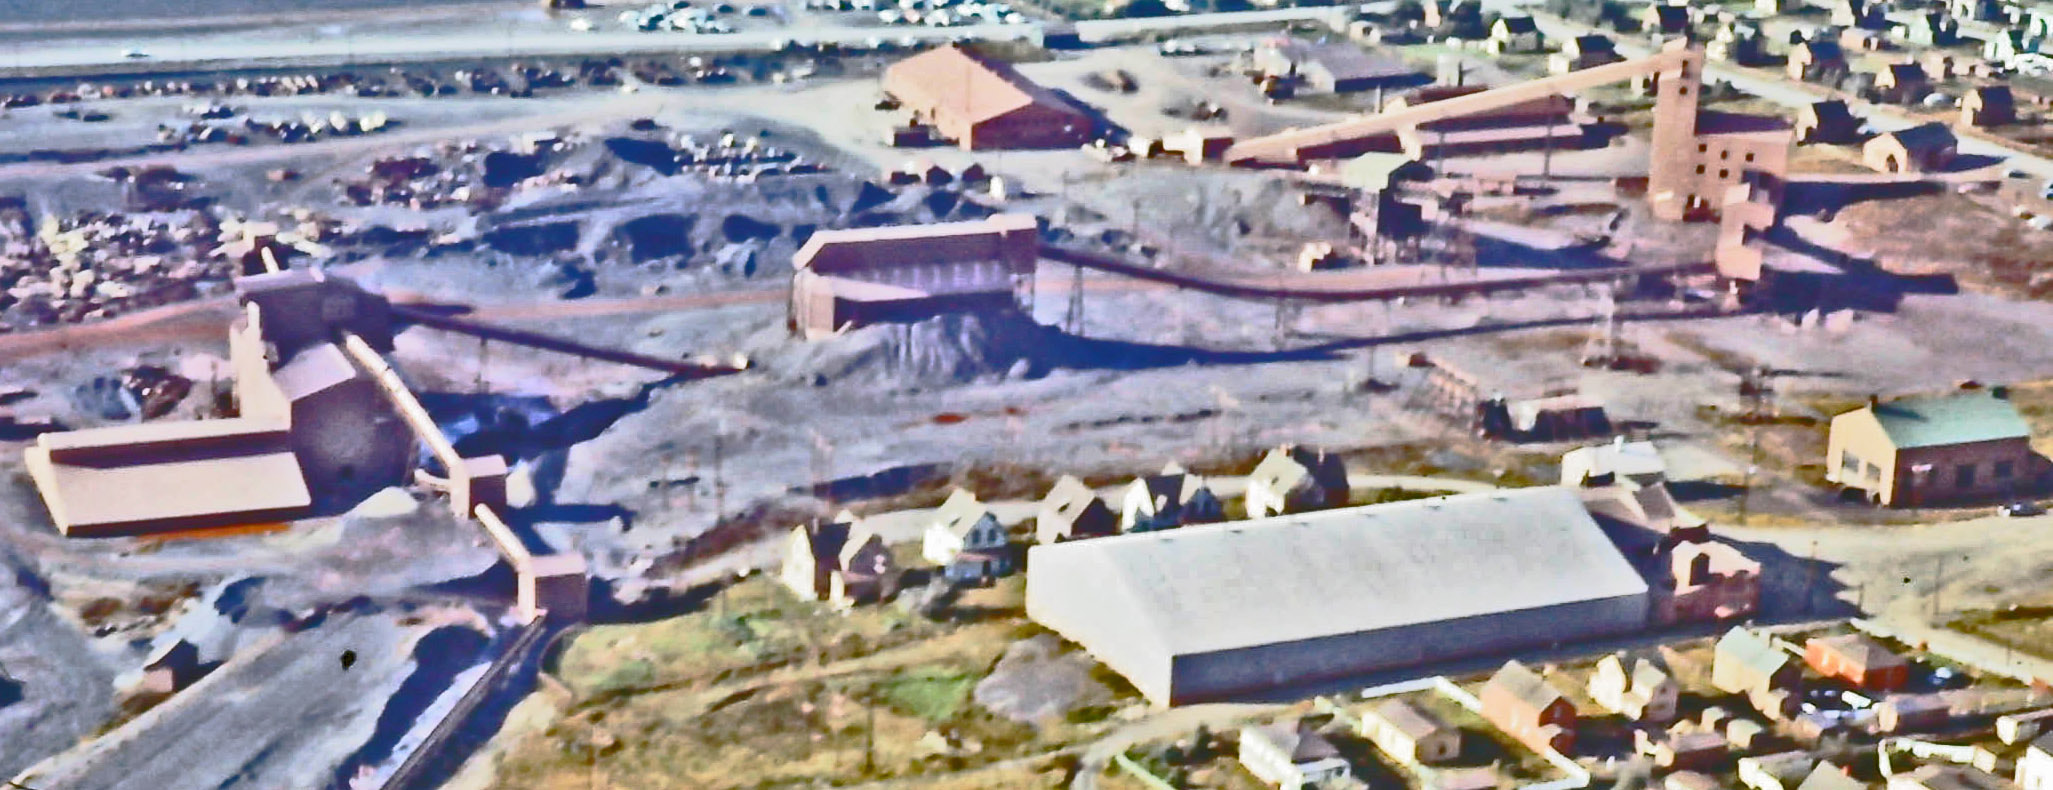
#73 Aerial view of No. 3 Mine Yard viewed from the northwest. No. 3 Bridge can be seen over West Mines Road in the lower right corner. Below is a cropped version highlighting the No. 3 Mine Yard.
#73-cropped version: No. 3 Mine Yard c.1959: This is a cropped version of the Southey aerial photo (#73) of No. 3 Mine Yard. I have also enhanced it to make the structures stand out as much as possible. Here is a description of the structures using information that was given in the Submarine Miner of March 1959, p. 7: In the bottom left (the east side of the yard) you see the Warehouse. In the middle-left of the photo is the new Ore Conveyor System (long slanted structure) leaving No. 3 Slope Collar and entering the new No. 3 Deckhead Building. (Just west of it, you can see the old green-roofed deckhead halfway between the Collar and the old green-roofed Hoist House, which is in the top-middle of the photo.) From the new Deckhead Building, the ore was moved along to the Secondary Crushing Unit. (The building just left of the old deckhead.) From the Secondary Crushing Unit, the ore went to the 7,000-ton Surge Pile (just to the right of the middle of the photo). A 42-inch reclaiming conveyor running underneath the Surge Pile forwarded the ore product to the Concentration Plant on the right of the picture. A 36-inch Float Conveyor discharged the Float product from the washing screens into a bin. From there it was trucked to waste. The beginning of the Trans-Island Conveyor that took the ore to the Scotia Pier on the south side of the Island can be seen just behind the Concentration Plant. The large, low building in the background is the Bartlett Memorial Arena. You can see the 5 Company Staff Houses between the Arena and No. 3 Yard. (Information from the Submarine Miner, V. 5, No. 1, January 1958, p. 7.) The green-roofed building in the middle left of the photo next to the parked cars was used as a Dry House in 1954. It was originally built in 1911 as the Methodist School and named "Bamford Hall" in honour of the minister, Rev. A.M. Bamford. Sometime in the 1920s, it was acquired by the mining company.

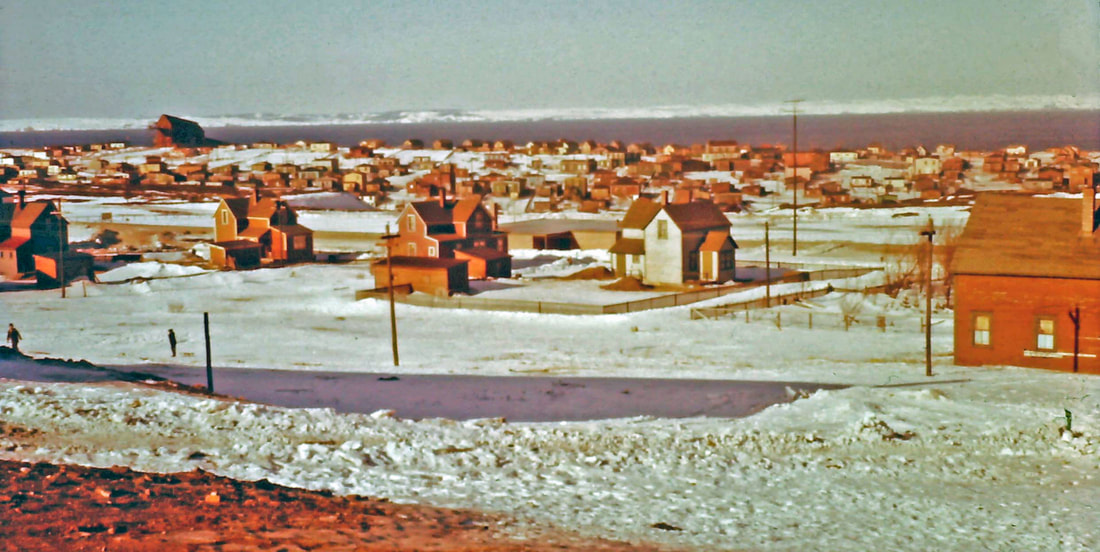
#74 Aerial view of No. 3 Mine Yard viewed from the south.
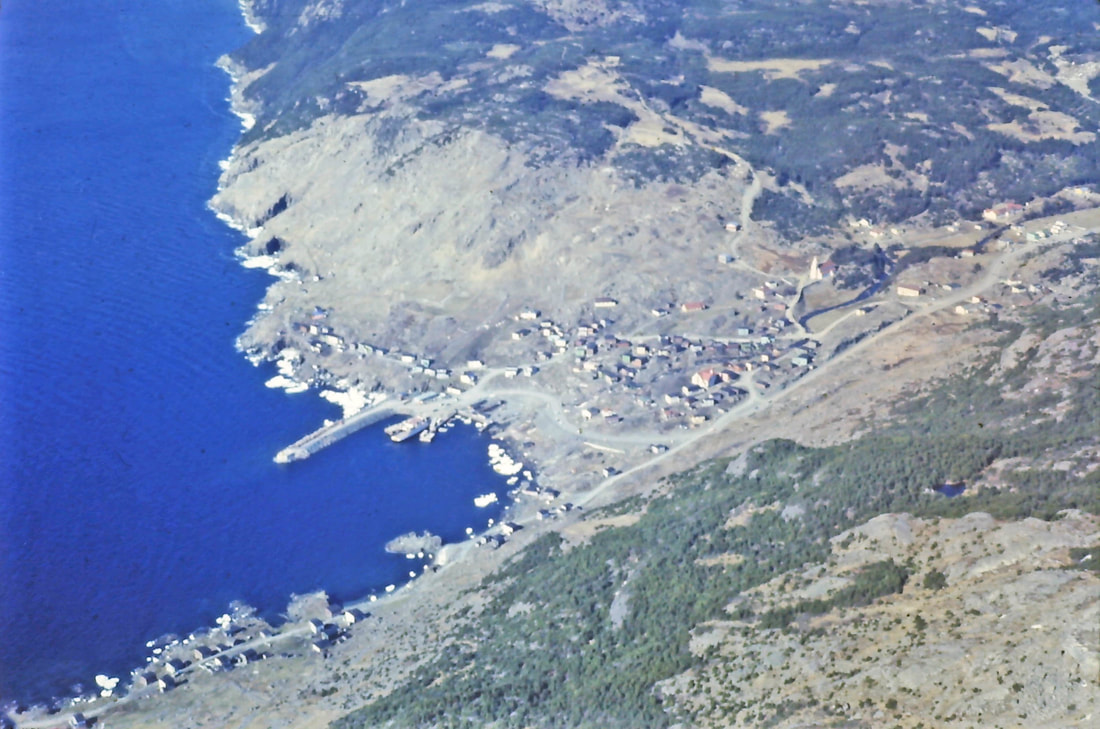
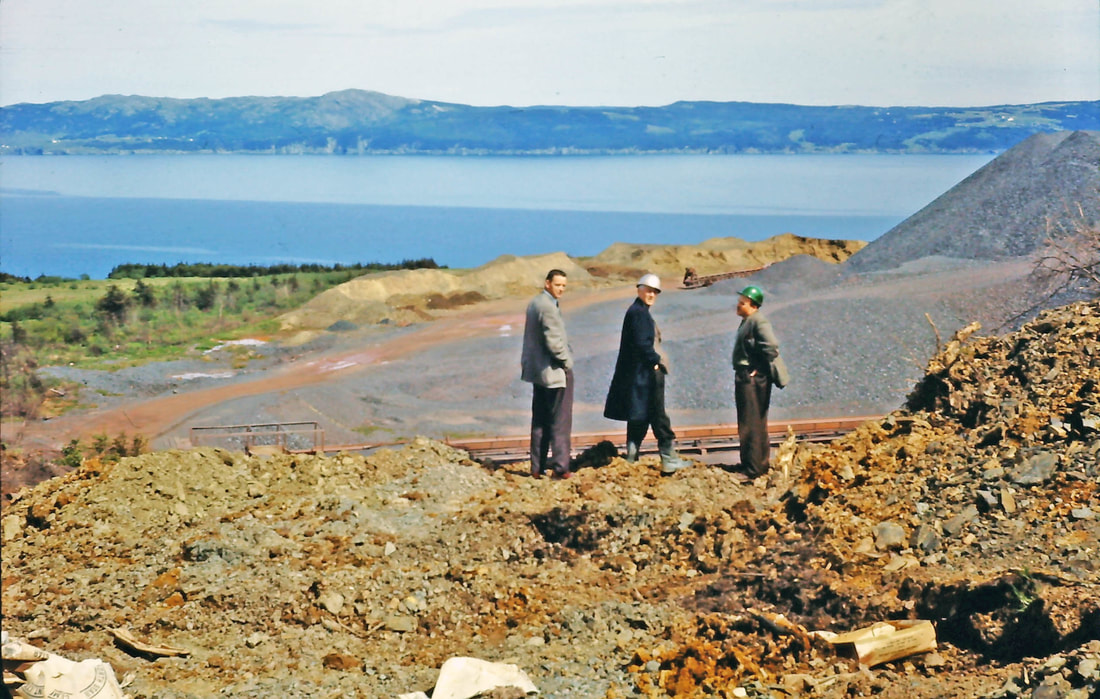
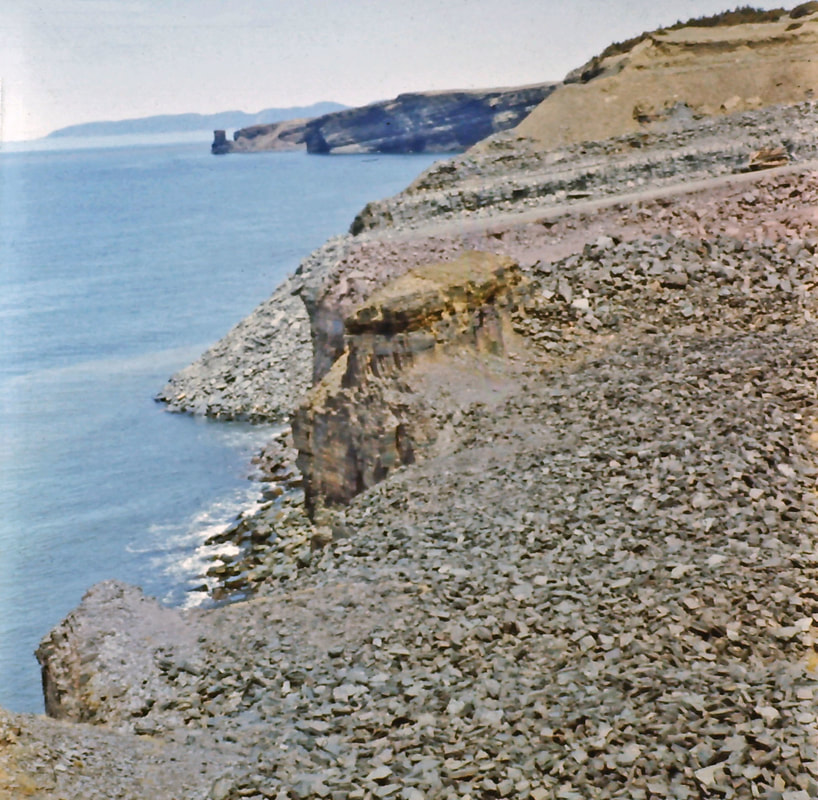
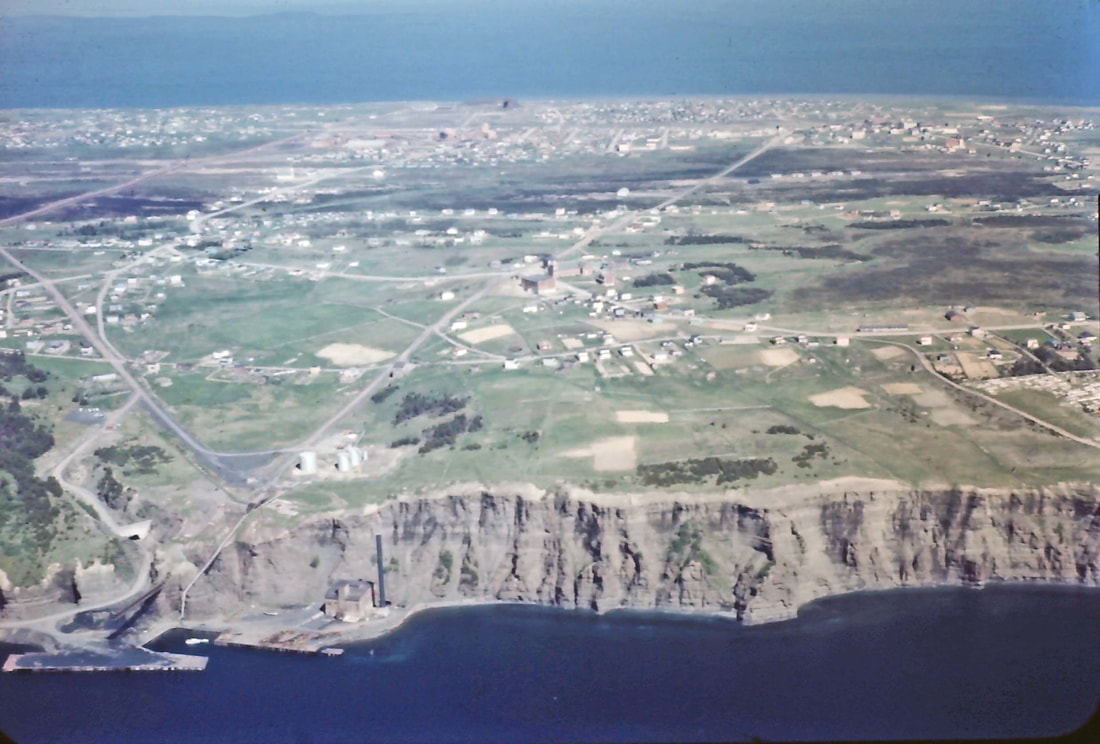
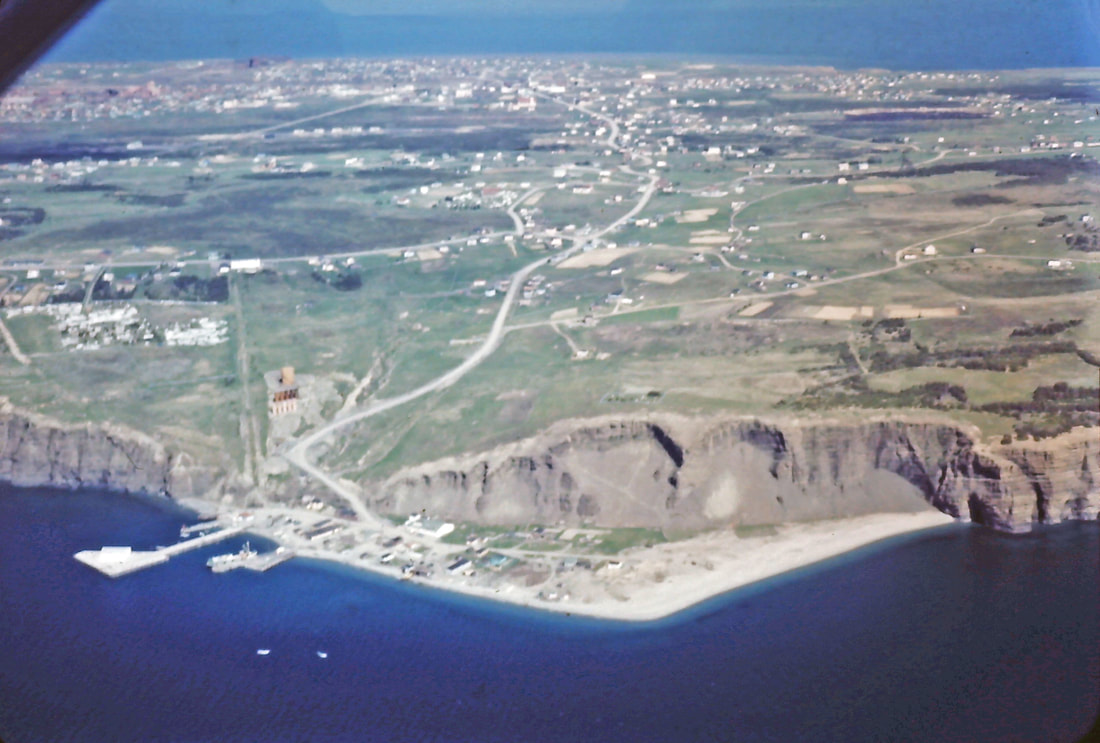
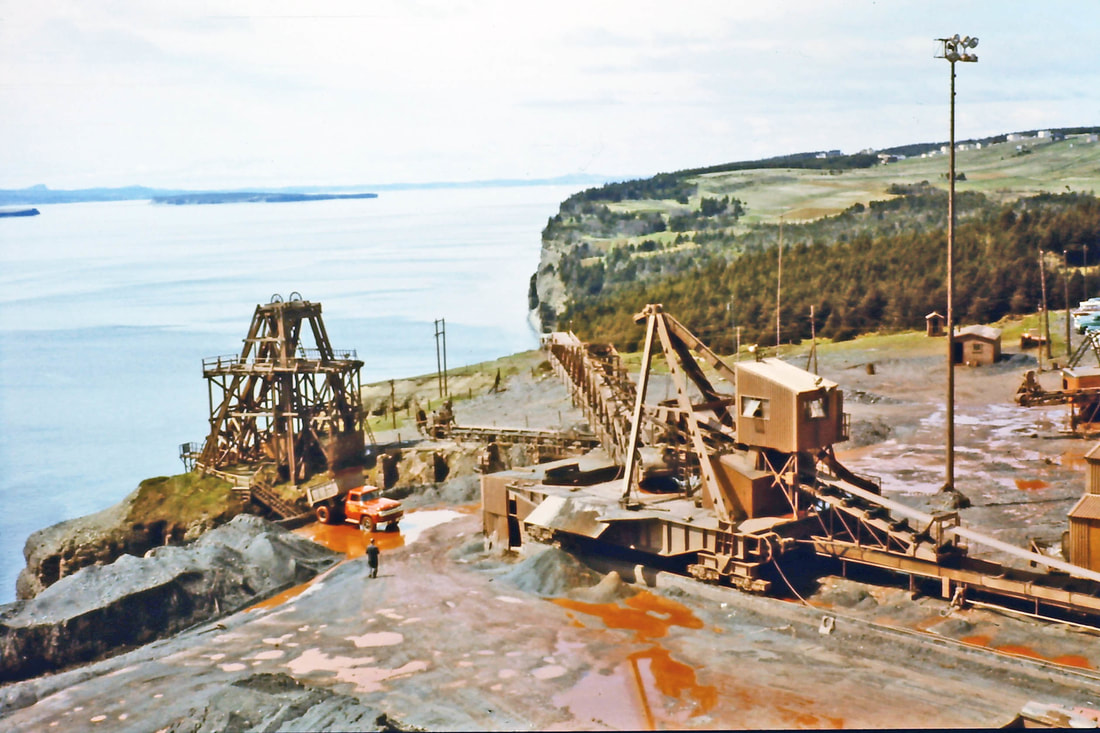
#75 Aerial view of Scotia No. 1 area showing Outcrop (surface deposit of mineral). This is the area where iron ore was first surface mined by the Scotia Company in the 1890s.
#76 & #77 There are a total of 87 slides in this collection housed at Archives and Special Collections division of MUN Library. Originally, there were 92 slides, but five were missing at the time they were donated to the MUN Library. #76 & #77 are two of the missing five. The caption ascribed to slide #76 on the list that accompanied the slide donation reads, "Kerry Head, Lance Cove & Kelly's Island." The caption ascribed to slide #77 simply reads, "Lance Cove."
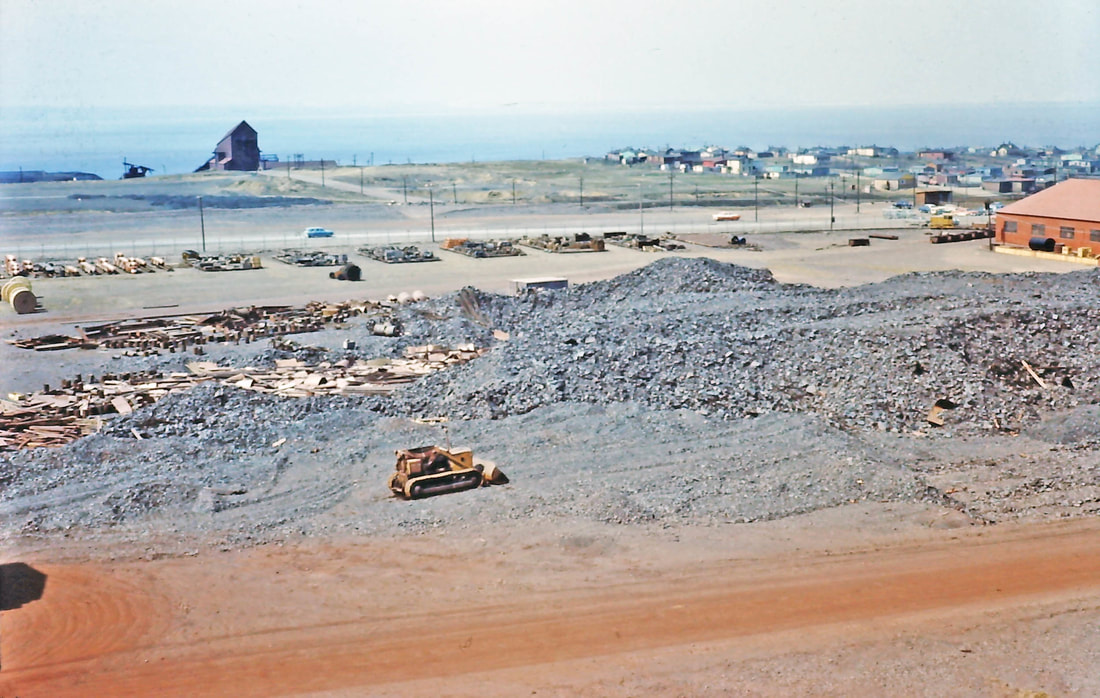
#78 The road to Scotia Pier is along the bottom of the photo. The house on the right was the Manager's house, built by Robert Chambers in 1900. C.B. Archibald was the longest running Manager, from 1919-1948, and lived in this house during that time. The next Manager, W.L. Stewe, lived in the house until 1953. Following his tenure, the house was divided into two apartments and rented to some of the incoming staff members. Ore ships can be seen in what was called "The Anchorage," between Bell Island and Little Bell Island. Kelly's Island is to the west.
#79 There are a total of 87 slides in this collection housed at Archives and Special Collections division of MUN Library. Originally, there were 92 slides, but 5 were missing at the time they were donated to the MUN Library. #79 is one of the missing five. The caption ascribed to slide #79 on the list that accompanied the slide donation reads, "Lance Cove."

#80 Back of Bell Island looking east along shoreline.
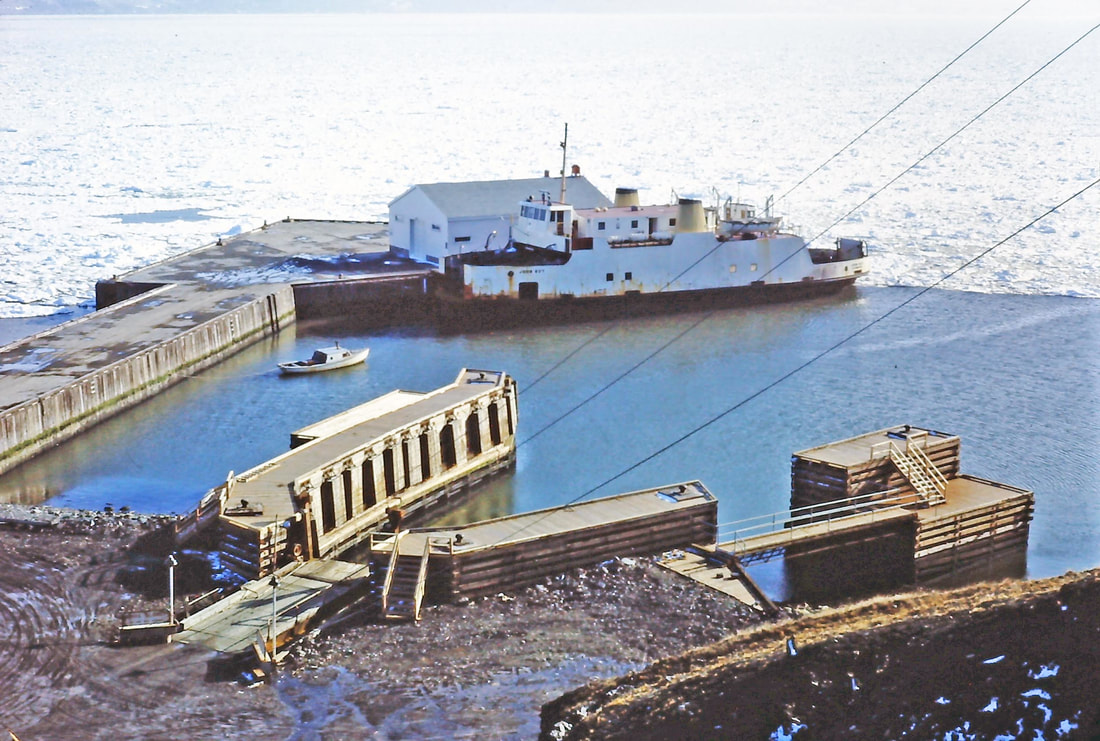
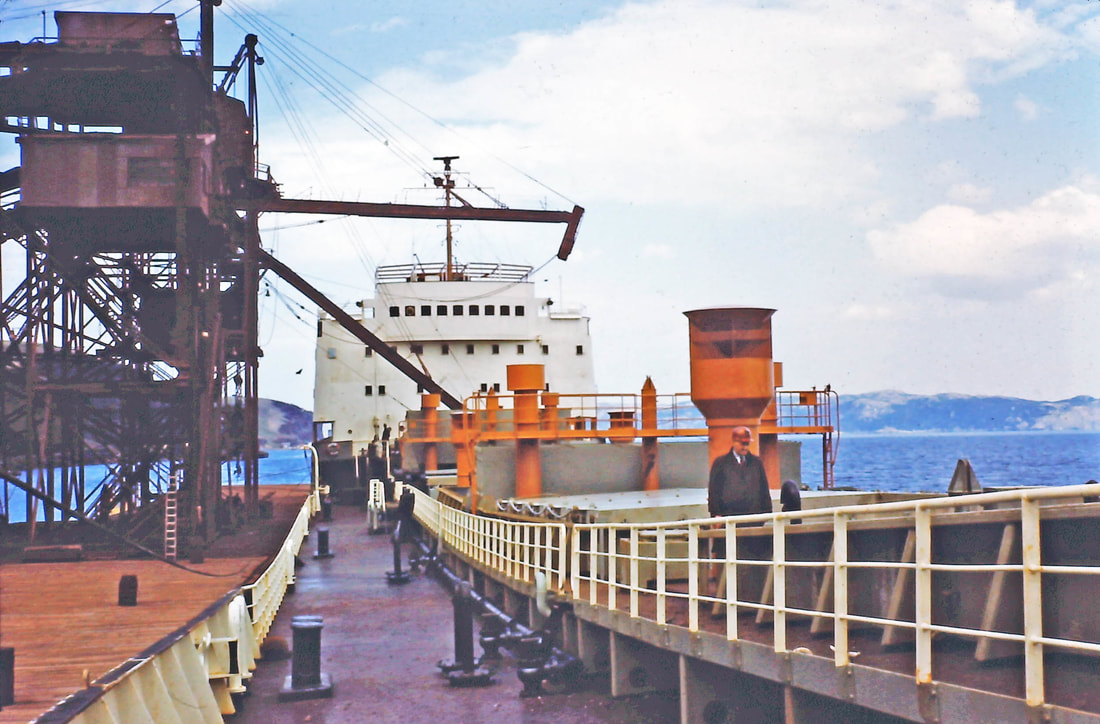
#81 Aerial view of Scotia Pier, Dominion Pier in background, viewed from the west.
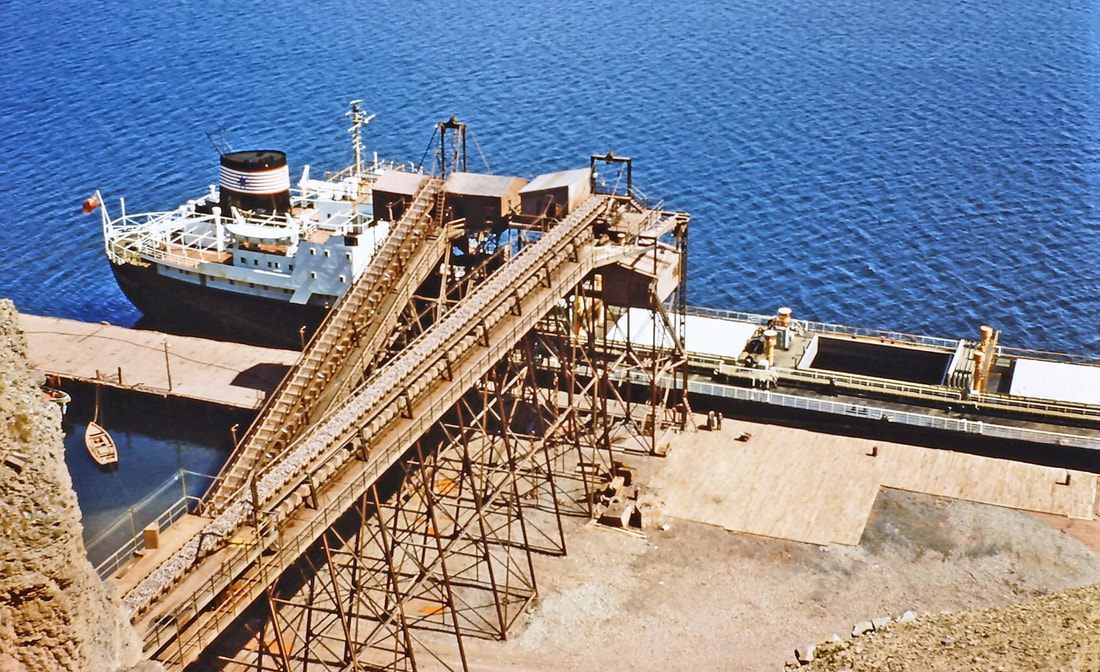
#82 Loading Ore Ship at Scotia Pier.
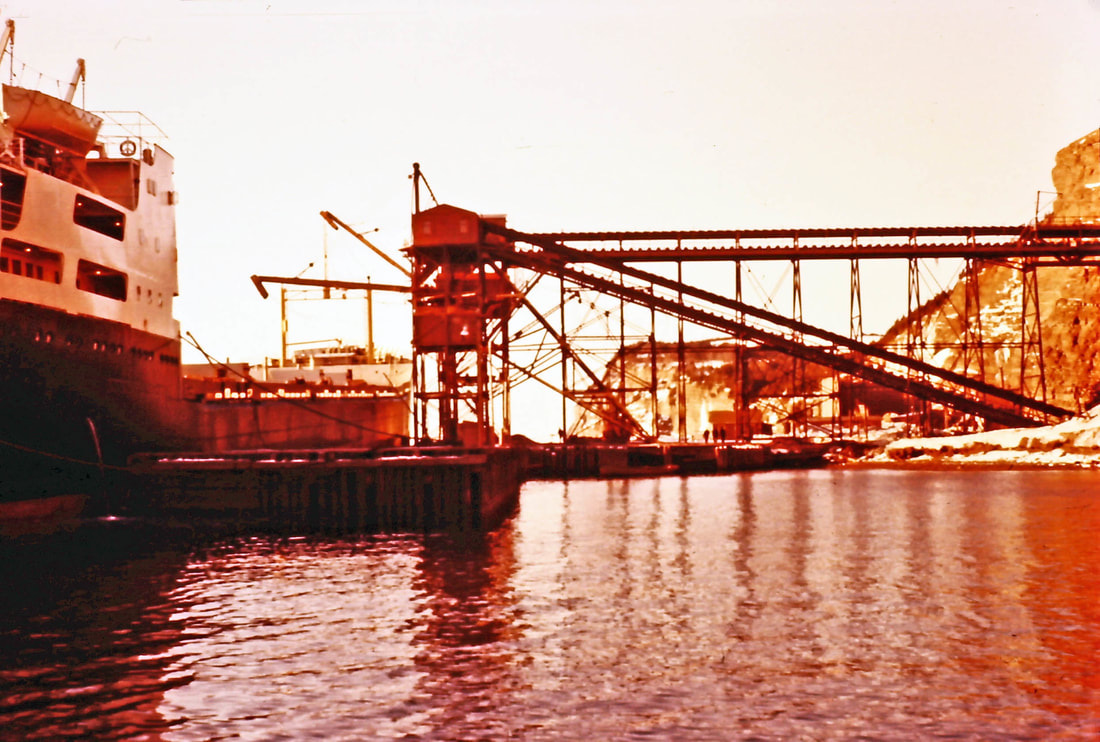
#83 Loading Ore Ship Nordland at Scotia Pier, viewed from the east.
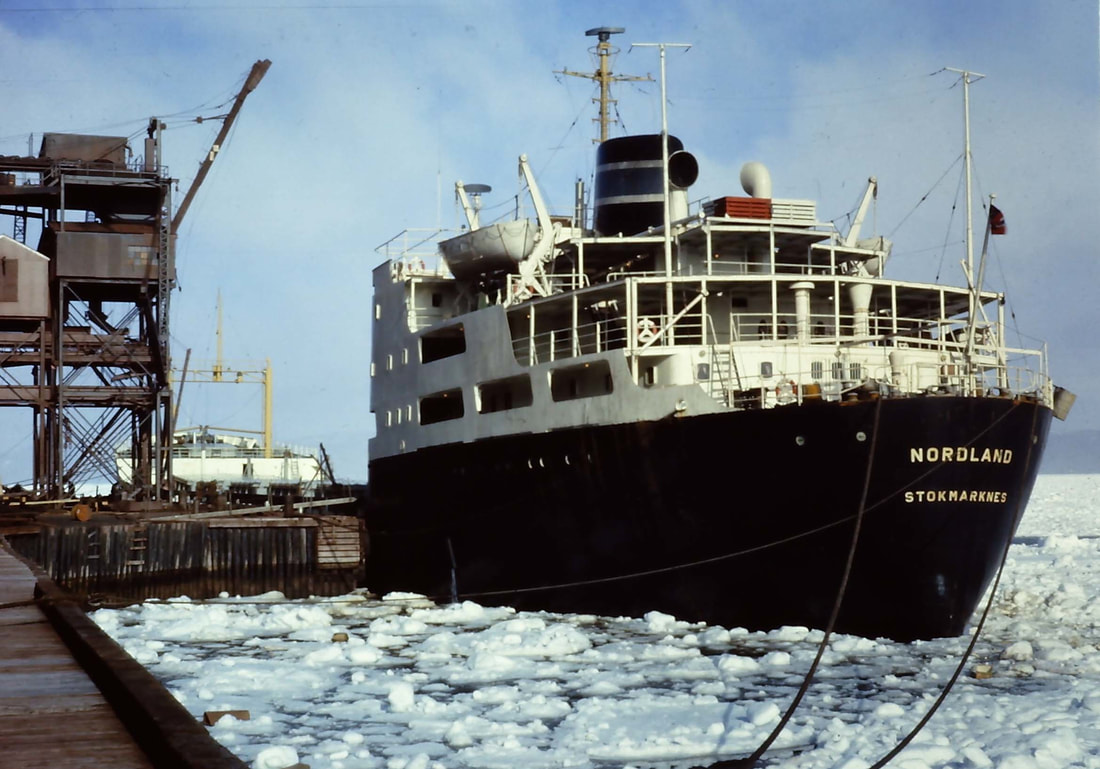
#84 The ore ship Nordland, registered in Stokmarknes, Norway, hemmed in by ice at Scotia Pier. (On the "Careless" page of this Photo Gallery, you will see another photo of the Nordland in the ice, which was taken by Tom Careless c.March 1962.)
#85 There are a total of 87 slides in this collection housed at Archives and Special Collections division of MUN Library. Originally, there were 92 slides, but 5 were missing at the time they were donated to the MUN Library. #85 is one of the missing five. The caption ascribed to slide #85 on the list that accompanied the slide donation reads, "The Pocket at Scotia Pier, Skipway at left."
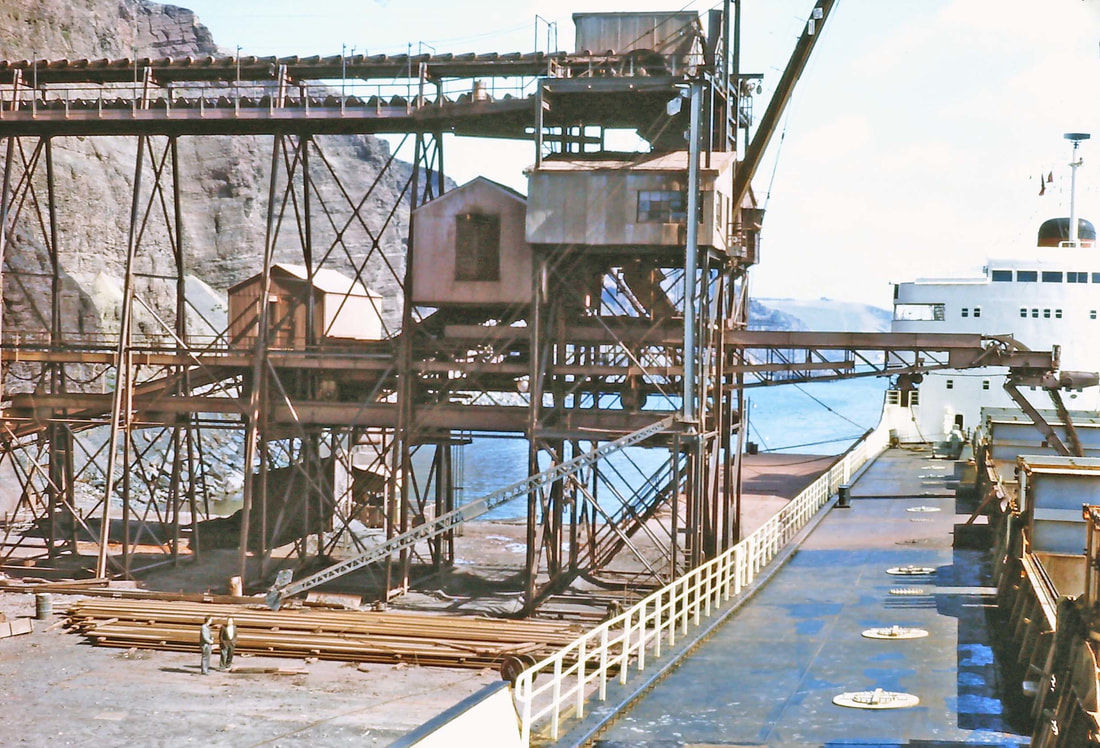
#86 Loading ore at Scotia Pier.
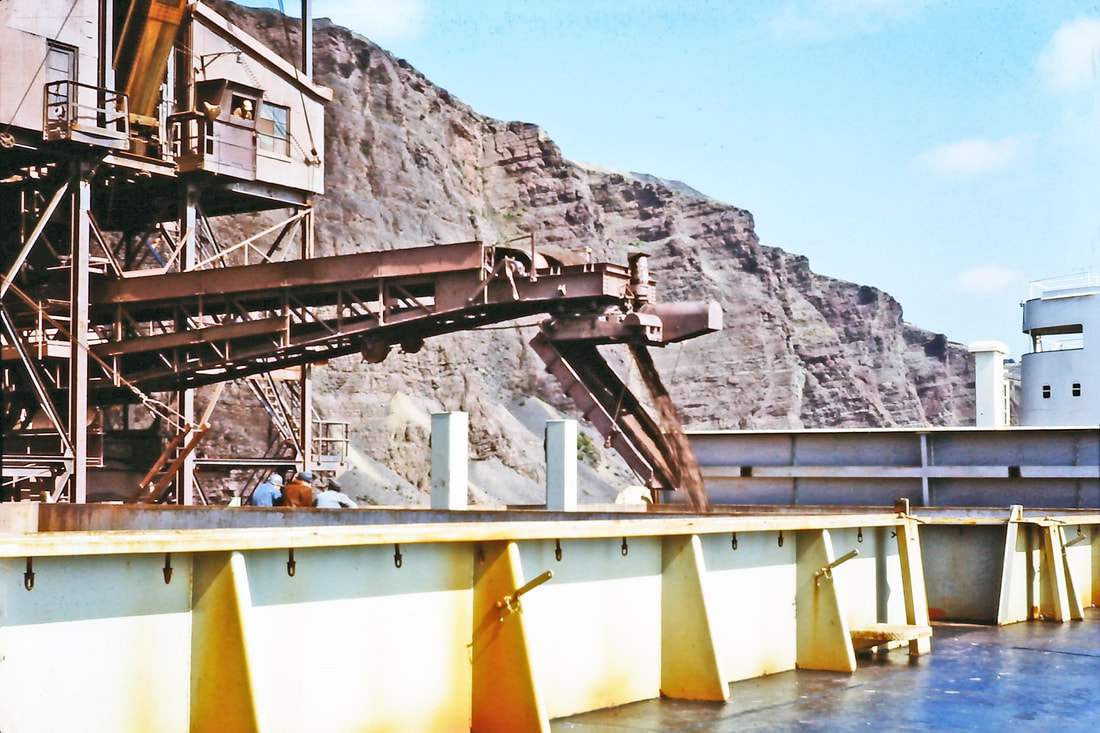
#87 Loading Ore Ship at Scotia Pier.
#88 Looking down Pocket at Scotia Pier.
#89 Charlie Belbin, Ship's Agent, onboard ore ship loading at Scotia Pier.
#90 Stockpile Area at Scotia Pier.
#91 Stockpile Area, Scotia Pier.
#92 Scotia Pier stockpile area in winter.